Hey there, foodie fam! If you’re wonderin’ how long to bake split chicken breast at 400°F, I’ve gotcha covered with the straight-up answer right outta the gate: 40 to 45 minutes for bone-in, skin-on split chicken breasts. That’s the sweet spot to get ‘em cooked through, juicy as heck, and with a crispy skin that’ll make your taste buds dance. But stick with me, ‘cause I’m gonna break down everything you need to know to nail this dish—whether you’re a kitchen newbie or a seasoned pro. We’re talkin’ prep, timing tricks, and how to avoid turnin’ your chicken into a dry ol’ hockey puck. Let’s dive in!
What’s a Split Chicken Breast, Anyway?
Before we get cookin’, let’s clear up what we’re dealin’ with. A split chicken breast ain’t just any ol’ piece of poultry. It’s a bone-in, skin-on cut, meanin’ it’s half of a whole chicken breast with the bone still attached and the skin left on. This ain’t the same as them boneless, skinless breasts you grab for quick meals. The bone and skin are game-changers—they keep the meat moist and pack in extra flavor while it bakes.
- Why Bone-In Matters: The bone slows down cookin’ near it, helpin’ the meat stay tender and juicy.
- Skin’s the Deal: That skin crisps up real nice at 400°F, lockin’ in juices and givin’ you that scrumdiddlyumptious crunch.
If you’ve got boneless breasts, the timing’s gonna be shorter (more on that later), but for split breasts, we’re stickin’ to the bone-in vibe. Got it? Cool, let’s move on!
Why Bake at 400°F? Ain’t That Hot?
You might be thinkin’ “400°F? Dang that’s high! Won’t it burn my chicken?” Nah, fam, it’s the perfect temp for split chicken breasts. Here’s why I swear by it
- Crispy Skin: Higher heat gets that skin golden and crackly without overcookin’ the inside.
- Juice Lock-In: It sears the outside quick, trappin’ moisture so your chicken don’t turn into cardboard.
- Speedy Cookin’: At 400°F, you ain’t waitin’ all day—40 to 45 minutes is usually just right for bone-in cuts.
Lower temps like 350°F work too, but they take longer, and the skin might not get that tasty crisp. Higher than 400°F can risk burnin’ before the inside’s done. So, 400°F is my go-to for that perfect balance. We good? Let’s talk exact timing.
How Long to Bake Split Chicken Breast at 400°F: The Deets
Alright, let’s get down to brass tacks For bone-in, skin-on split chicken breasts, you’re lookin’ at 40 to 45 minutes in a 400°F oven. But hold up—cookin’ ain’t always a one-size-fits-all deal. Here’s what can mess with that timing and how to roll with it
- Size and Thickness: A big, thick split breast (like 1.5 pounds each) might need closer to 45 minutes or a tad more. Smaller ones (around ¾ pound) could be done at 40 minutes.
- Oven Quirks: Some ovens run hot or cold. If yours is wonky, keep an eye out a few minutes early.
- Frozen or Thawed: If you forgot to thaw your chicken (been there!), add 10-15 minutes, or better yet, thaw it first in the fridge overnight for even cookin’.
- Searing First: I love searin’ the skin in a hot skillet for 3-4 minutes before bakin’. It don’t add much total time but makes the skin next-level crispy.
No matter what, the real MVP here is a meat thermometer. Pop it into the thickest part of the meat, right near the bone, and make sure it hits 165°F. That’s the safe temp to kill off any nasty bugs. I sometimes let mine creep to 180°F for extra tenderness, but 165°F is the minimum. Don’t got a thermometer? Cut into the thickest part—if the juices run clear and there ain’t no pink near the bone, you’re golden.
Here’s a quick table for bakin’ split chicken breasts at different temps, just in case 400°F ain’t your jam:
| Temperature | Cooking Time (Bone-In Split Breast) |
|---|---|
| 350°F (175°C) | 50-55 minutes |
| 375°F (190°C) | 45-50 minutes |
| 400°F (205°C) | 40-45 minutes |
| 425°F (220°C) | 35-40 minutes |
| 450°F (230°C) | 30-35 minutes |
Stick with 400°F for the best mix of speed and flavor, though. Now, let’s walk through how to do this step by step.
Step-by-Step Guide to Bakin’ Split Chicken Breast at 400°F
I’m gonna lay this out like I’m right there in the kitchen with ya. Me and my pals we love this recipe cause it’s stupid easy and always turns out tastetastic. Follow along, and you’ll have dinner ready in no time.
1. Preheat That Oven, Yo
Set your oven to 400°F (205°C). Give it time to heat up while you prep—don’t skip this, ‘cause a cold oven messes with timing. Line a bakin’ sheet with parchment paper or foil for easy cleanup, or just grease a bakin’ dish with a lil’ oil.
2. Prep Your Chicken
Rinse them split breasts under cold water and pat ‘em dry with paper towels. Wet chicken don’t crisp up good, so dry ‘em well. Rub about a tablespoon of olive oil all over each piece, especially on the skin side that’ll face up while bakin’. This helps the skin brown and keeps things moist.
3. Season Like a Boss
Sprinkle on some flavor! I keep it simple with:
- ½ teaspoon salt per breast
- ¼ teaspoon black pepper
- ¼ teaspoon garlic powder
- ¼ teaspoon onion powder
- ¼ teaspoon paprika for a lil’ smokiness
Feel free to switch it up—add cayenne for heat, or fresh herbs like thyme or rosemary if you’re feelin’ fancy. Rub that seasoning into the skin and under it if you can. Place ‘em skin-side up on your bakin’ sheet.
4. Sear for Extra Crunch (Optional but Awesome)
If you want that skin to be outta-this-world crispy, heat up a skillet on medium-high. No need for extra oil since you already rubbed it on. Lay the breasts skin-side down and sear for 3-4 minutes ‘til golden brown. Then pop ‘em back on the bakin’ sheet, skin-side up.
5. Bake It, Baby
Slide that tray into the preheated oven. Set a timer for 40 minutes, but start checkin’ at 35 if your pieces are small. Bake ‘til the internal temp hits 165°F near the bone. If you ain’t got a thermometer, poke the thickest part—clear juices and no pink means it’s done.
6. Rest Before You Dig In
Pull the chicken outta the oven and let it chill for 3-5 minutes on the counter. Don’t cut right away, or all them juices gonna spill out and leave ya with dry meat. Restin’ lets the flavor soak back in.
7. Serve and Chow Down
Slice it up or serve whole. Pair it with whatever you’re cravin’—more on that in a sec. That’s it, fam! You just made some bomb chicken.
Keepin’ It Juicy: Tips to Avoid Dry Chicken
Nothin’ sucks worse than bitin’ into dry, chewy chicken. I’ve messed this up plenty before figurin’ out these tricks. Here’s how to keep your split chicken breast moist and tender:
- Don’t Skip the Skin and Bone: They act like a shield, holdin’ in moisture. Boneless, skinless cooks faster but dries out easier.
- Don’t Overcook: Past 165°F is fine, but don’t go crazy—check early and often with a thermometer.
- Rest It: Them 3-5 minutes of restin’ after bakin’ is non-negotiable. Cut too soon, and it’s bye-bye juiciness.
- Sear First: That quick skillet sear locks in flavor and moisture before the oven does its thing.
- Lower Temp for Longer if Nervous: If 400°F freaks ya out, drop to 375°F and add 5-10 minutes. Slower cookin’ can be gentler on the meat.
If it still comes out dry, don’t beat yourself up. Slice it thin and toss it in a sauce or gravy—saves the day every time.
What If I’ve Got Boneless Chicken Instead?
Hey, if you grabbed boneless, skinless breasts by mistake, no sweat. The timing’s different, though. At 400°F, they only need 20 to 25 minutes for a medium-sized piece (5-6 ounces). Thicker ones might hit 30 minutes, but always check for 165°F inside. They cook faster without the bone, but watch out—they dry out quicker too. Rub on some oil and season just like split breasts to keep ‘em from turnin’ to sawdust.
Sides to Make Your Meal Pop
Split chicken breast at 400°F is versatile as heck. You can pair it with just about anything for a full-on feast. Here’s what I love throwin’ on the plate:
- Veggie Vibes: Roast some green beans or asparagus right on the same tray for the last 15 minutes of bakin’. Drizzle with oil and a pinch of salt—easy peasy.
- Starchy Goodness: Mashed potatoes with a dollop of butter or some garlic bread to soak up them juices.
- Creamy Fix: A side of creamed corn or coleslaw for a lil’ sweetness to balance the savory chicken.
- Grain Game: Fluffy rice or quinoa if you’re keepin’ it light.
I once paired mine with cheesy mac, and lemme tell ya, it was a match made in heaven. What’s your fave side? Mix and match ‘til you find your jam.
Leftover Love: What to Do with Extra Chicken
If you’ve got leftovers (or made extra on purpose), don’t just reheat and call it a day. That baked split chicken breast can live a second life in some killer dishes. Here’s what I do:
- Soups and Stews: Shred it and toss into a pot of chicken noodle soup or a spicy tortilla soup. The flavor’s already baked in, so it’s a shortcut to awesome.
- Casseroles: Mix with pasta, cream sauce, and cheese for a cozy bake. Pop it back in the oven at 350°F ‘til bubbly.
- Salads: Chop it up for a chicken salad sandwich. Add mayo, celery, and a dash of pepper—lunch sorted.
- Enchiladas: Roll shredded chicken in tortillas with sauce and cheese. Bake ‘til melty. Dang, now I’m hungry.
Store leftovers in an airtight container in the fridge for 3-4 days, or freeze for up to 3 months. Wrap tight in plastic and foil to avoid freezer burn. Reheat gently at 350°F to keep it from dryin’ out.
Troubleshootin’ Common Hiccups
Even with the best plan, stuff can go sideways in the kitchen. I’ve had my share of flops, so here’s how to fix common issues with bakin’ split chicken breast at 400°F:
- Undercooked Near the Bone: If the timer’s up but it’s pink near the bone, pop it back in for 5-10 minutes. Cover with foil if the skin’s already crispy to avoid burnin’.
- Overcooked and Dry: Next time, check temp earlier. For now, slice thin and serve with a sauce or gravy to mask it.
- Skin Ain’t Crispy: Forgot to sear or pat dry? Crank the oven to broil for the last 2-3 minutes, but watch it like a hawk so it don’t char.
- Uneven Cookin’: If one piece is done and another ain’t, pull the cooked one out and let the other finish. Ovens can be sneaky like that.
Got other woes? Drop a comment, and I’ll brainstorm with ya. We’ve all been there!
Variations to Spice Things Up
Bored of the same ol’ seasoning? Switch it up! Since you’re bakin’ at 400°F for 40-45 minutes anyway, play with flavors to keep things fresh. Here’s some ideas I’ve tried:
- Spicy Kick: Rub on some chili powder and cayenne with your usual salt and pepper. Gives it a lil’ heat that pairs great with cool sides like slaw.
- Herb Heaven: Fresh rosemary or thyme tucked under the skin before bakin’ makes it smell like a fancy restaurant in your kitchen.
- Sweet ‘n’ Smoky: Mix a teaspoon of brown sugar with paprika and garlic powder for a BBQ vibe without the grill.
- Garlic Lover’s Dream: Smash a few garlic cloves and stuff ‘em under the skin. The flavor bakes right in—pure magic.
Experiment, fam. Worst case, ya learn what you don’t like. Best case, you got a new fave recipe.
Why I’m Obsessed with This Dish
Lemme get real for a sec. Bakin’ split chicken breast at 400°F is one of my go-to moves ‘cause it’s cheap, healthy, and don’t take a ton of skill. The bone-in cut costs less per pound than boneless, and the skin makes it feel indulgent without bein’ bad for ya. Plus, 40-45 minutes gives me just enough time to whip up sides or scroll my phone without stressin’. I’ve made this for weeknight dinners, family get-togethers, and even date nights (yep, it impressed!). It’s that reliable.
One time, I overcooked it ‘cause I got distracted by a Netflix binge—total rookie move. But I sliced it up, threw it in a creamy pasta, and nobody knew the diff. That’s the beauty of this dish—it’s forgiving if you know a few tricks.
Wrappin’ It Up: Your Chicken Game Just Leveled Up
So, there ya have it—how long to bake split chicken breast at 400°F comes down to 40 to 45 minutes for bone-in, skin-on cuts, with a quick check for 165°F internal temp to be sure. We walked through preppin’, seasonin’, bakin’, and servin’ this bad boy, plus tips to keep it juicy and ideas for leftovers or sides. Whether you sear the skin for extra crunch or toss on wild seasonings, this method’s a winner.
Next time you’re starin’ at a pack of split chicken breasts wonderin’ what to do, remember this guide. Preheat to 400°F, set that timer, and let the oven work its magic. Got questions or a dope variation to share? Hit me up in the comments—I’m all ears. Now go make some chicken that’s so good, your crew’ll be beggin’ for seconds!

Bake at 425°(F) for 35-45 minutes
Place the sheet pan of chicken into a preheated oven set to 425°F and bake for 35-45 minutes. While chicken is considered safe to eat when its internal temperature reaches 165°F, we want our chicken quarters to reach around 195°F for optimal results. At 195°F, the collagen breaks down, resulting in incredibly tender and flavorful chicken that is juicy and succulent. If the chicken is only cooked to 165°F, it will be tough and lacking in juiciness. Note that the internal temperature of 165°F is suitable for white meat, such as chicken breast, but for dark meat quarters, we aim for 195°F.
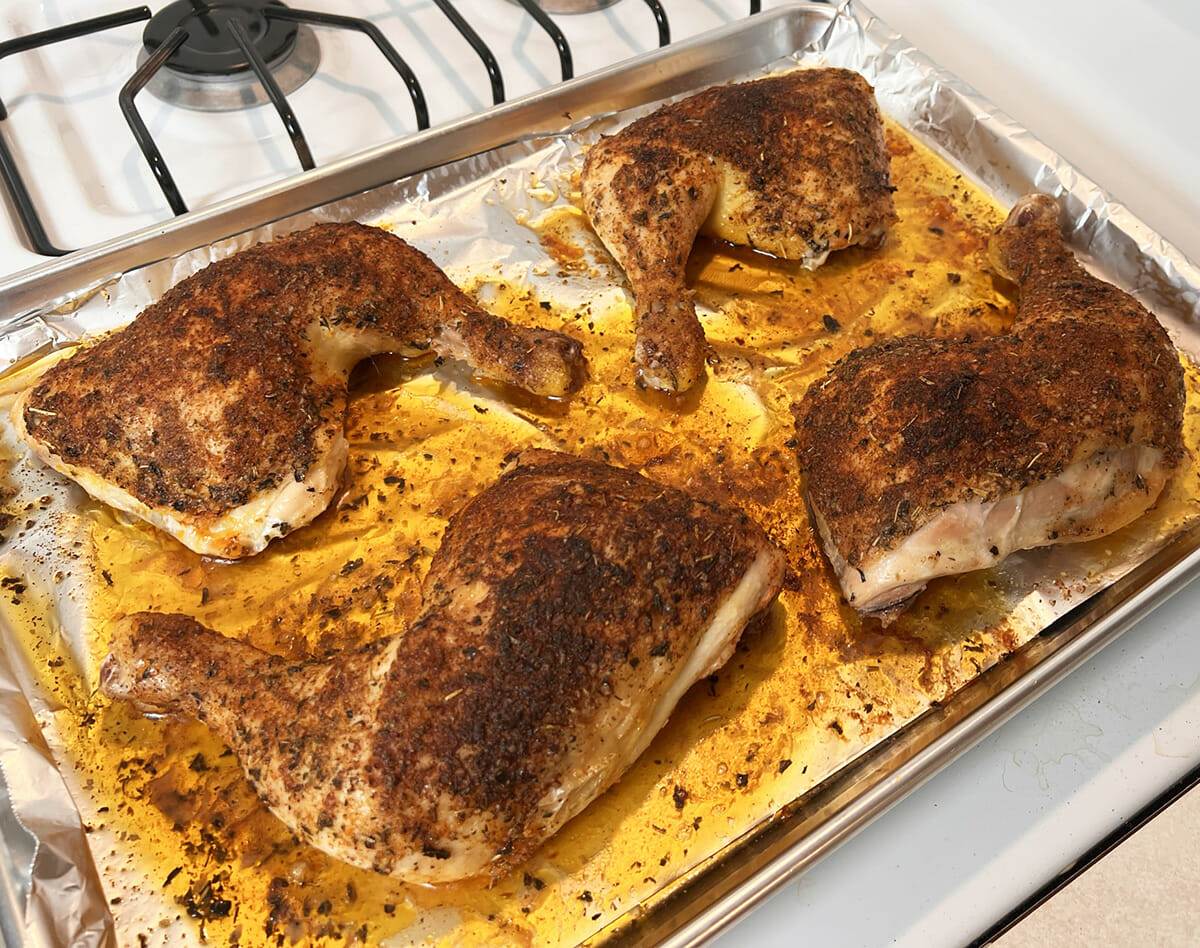
To achieve the target temperature of 195°F, remove the chicken from the oven when the internal temperature registers approximately 185°F on an instant-read thermometer. Once taken out of the oven, the temperature will continue to rise, reaching our desired temperature in about 5 minutes.
For more information on cooking chicken above 165°, check out this great article by America’s Test Kitchen.
An essential tool in your kitchen is an instant-read thermometer, as it allows you to accurately measure the internal temperature of foods for optimal results. In recipes like this one, the size of the chicken quarters may vary, and oven temperatures can differ as well. While the approximate cooking time is 35-45 minutes, we can ensure perfectly cooked chicken every time by monitoring the internal temperature. Again, for this recipe, it’s recommended to remove the chicken from the oven when it reaches 185°F.
Let Chicken Rest Before Serving
When the chicken is done, remove from the oven and let it rest for about 5-10 minutes. By allowing the chicken to rest, the juices have a chance to seep back into the meat. As the chicken cools, the proteins start to relax, and the juices are able to move back through the meat. This helps keep the chicken juicy and flavorful when you cut into it.
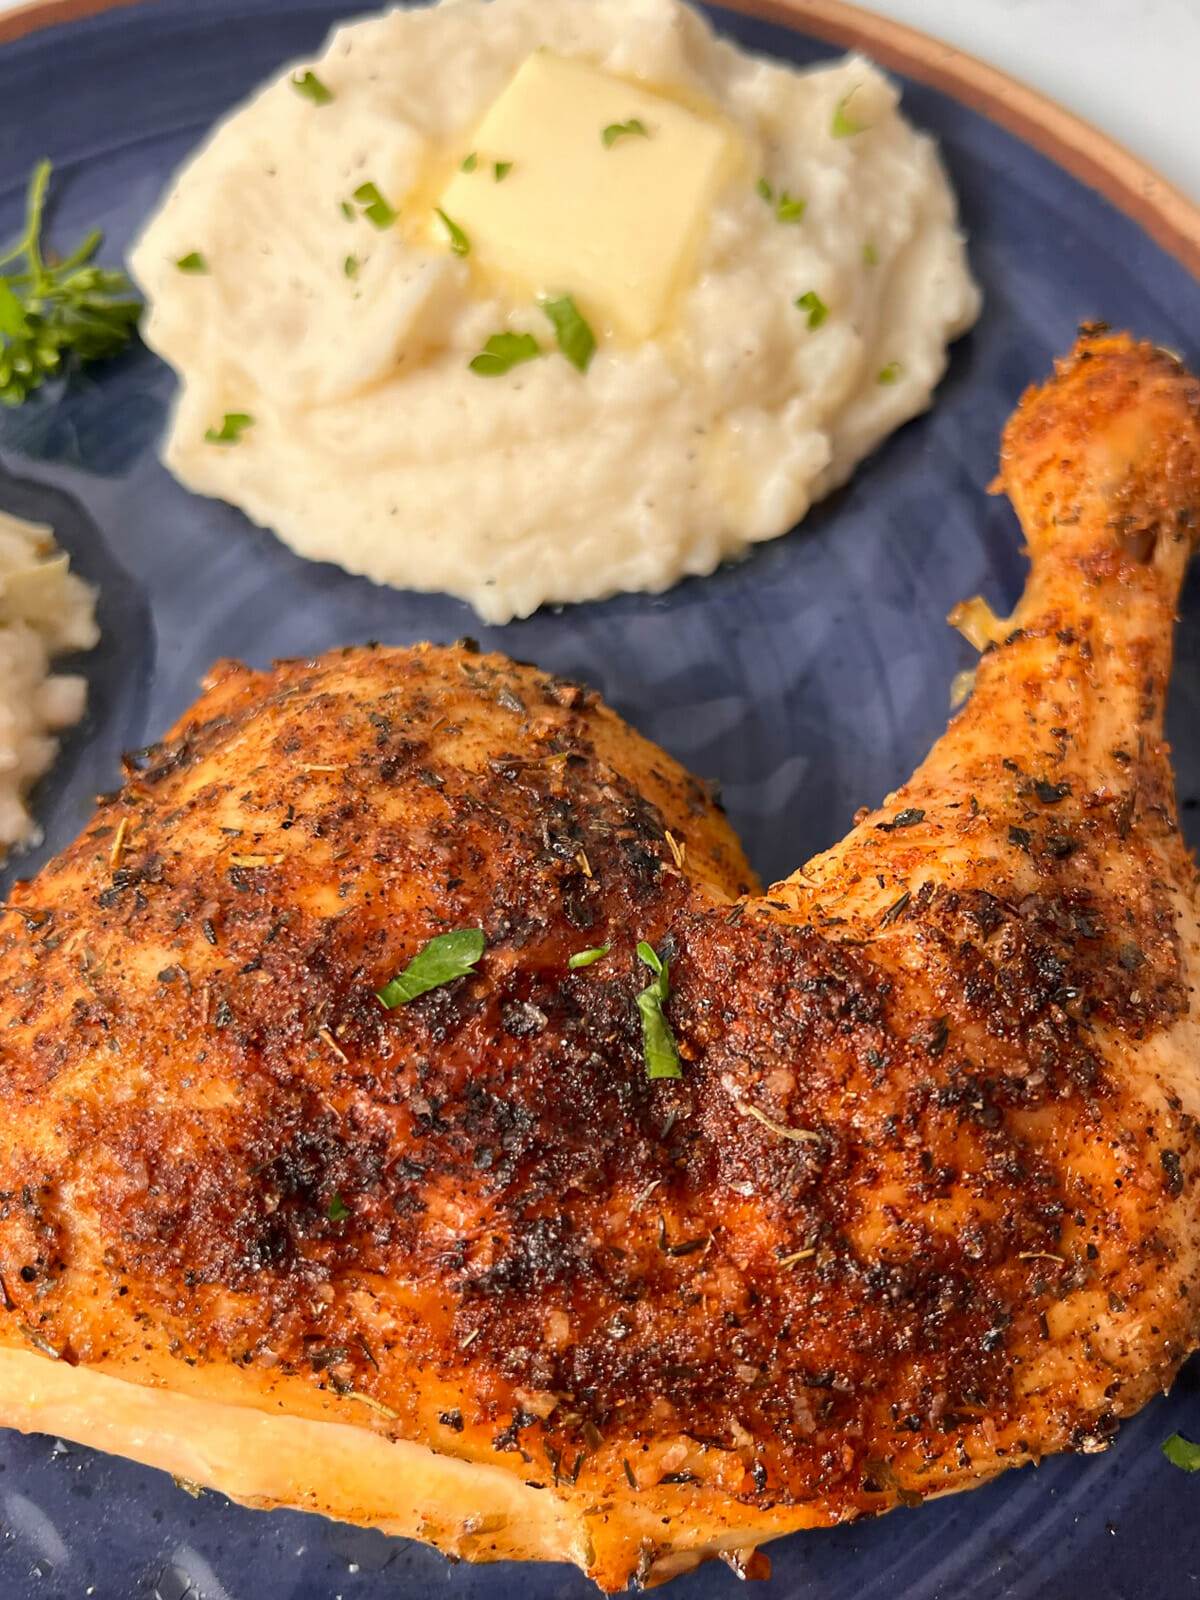
Instant Pot Mashed Potatoes: A natural pairing, our Instant Pot mashed potatoes are easy to make, rich, and OH so good!
Air Fryer Brussels Sprouts: With a pit of parmesan cheese and ranch seasonings, these are sure to please even the pickiest eaters.
Country Creamy Coleslaw: Another natural pairing, chicken and coleslaw go together perfectly for the most comforting of meals.
Sure it can, just make sure you have enough rook on your sheet pan. Chicken quarters can be pretty large. Just double everything. Cooking time will be closer to 45 minutes but monitor with instant read thermometer.
This chicken is best when it’s fresh out of the oven. That’s when we have some nice crisp on the skin and the juiciest meat. However, if meal planning for the week, it certainly makes a delicious meal the next day. It’s even better this way when shredded up and put over a salad.
Preheat your oven to 325°F. Place the cooked chicken quarters on a baking sheet and loosely cover them with aluminum foil to keep them from drying out. Put the baking sheet in the oven and heat the chicken quarters for 15-20 minutes. Remove the foil for the last 5 minutes of heating for crispier skin.
Absolutely you can? If you have a favorite chicken seasoning blend, go right ahead and use it.
PERFECTLY BAKED BONE IN CHICKEN BREAST
FAQ
How long to cook split chicken breast in oven?
With these tips, you can avoid overcooking or undercooking the chicken and enjoy a tasty and healthy meal. How Long Does It Take To Cook Split Chicken Breast In The Oven? On average, it takes about 30-40 minutes to cook split chicken breast in a preheated 375°F (190°C) oven.
How long does it take to cook split chicken?
On average, it takes about 30-40 minutes to cook split chicken breast in a preheated 375°F (190°C) oven. This time may vary depending on the size and thickness of the chicken breasts. Do I Need To Marinate The Chicken Before Baking? It is not necessary to marinate the chicken before baking, but marinating can add flavor and moisture to the meat.
How long do you cook a chicken breast in the oven?
Cooking time might vary based on the size of chicken breast, on average, you’ll need 55min, highly recommend cooking chicken by temperature. For a crispier skin, switch your oven from Bake to Broil, and broil the tops for 2 minutes before removing them from the oven.
What temperature do you cook split chicken?
For bone-in split chicken breast, preheat to 375°F (190°C), and for boneless split chicken breast, preheat to 400°F (200°C). This ensures that the chicken cooks evenly and achieves a desirable texture. Place the seasoned split chicken breast on a baking sheet or in a baking dish.
How long do you cook frozen chicken breast in the oven?
Once the frozen chicken breast is thawed, you can follow the standard cooking times for cooking split chicken breast in the oven. A general rule of thumb is to cook it for approximately 20 to 30 minutes per pound at an oven temperature of 375°F (190°C).
How do you cook boneless split chicken?
For boneless split chicken breast: Preheat your oven to 400°F (200°C). Place the chicken breast on a baking sheet or in a baking dish. Cook for approximately 20-25 minutes or until the internal temperature reaches 165°F (74°C).
How long does it take to cook a chicken breast at 400 in the oven?
What temperature do you bake split chicken breast?
For baked split chicken breast, a recommended oven temperature is 400°F (200°C), which promotes browning and crispiness while keeping the chicken moist. You can also use 375°F (190°C) for a softer skin, or a slightly higher 425°F (220°C) if you prefer quicker cooking. The key is to bake the chicken until a meat thermometer inserted into the thickest part registers 165°F (74°C) to ensure it’s fully cooked and safe to eat.
Is it better to bake bone-in chicken at 350 or 400?
The ideal temperature to roast bone-in chicken breasts is 400oF. However, you can bake chicken in an oven that’s anywhere from 350oF to 425oF. Obviously, cooking time is affected. You’ll have to add time if you’re roasting it at 350oF and subtract time at 425oF. Again, an instant read thermometer is your friend.