Hey there! I’ve been hatching brine shrimp for years and I’m excited to share my tried-and-true method with you. Whether you’re a newbie fish keeper or an experienced aquarist this guide will help you master the art of hatching these amazing little creatures.
Why Should You Hatch Brine Shrimp?
Before we dive in, let me tell you why hatching your own brine shrimp is totally worth it:
- Perfect first food for baby fish
- Triggers natural feeding responses in fish
- Way cheaper than buying live brine shrimp
- You control the whole process
- Fresh food available whenever you need it
- Zero contamination risks
- It’s actually pretty fun!
What You’ll Need
Let’s gather our supplies:
- Clear container (1-2 liters) – can be a jar or plastic bottle
- Air pump with airline tubing
- Non-iodized salt (aquarium salt works great)
- Brine shrimp eggs
- Light source
- Small net or sieve
- Clean water
- Optional: hydrometer to measure salinity
Step-by-Step Hatching Process
1. Setting Up Your Hatchery
First things first let’s get that container ready
- Clean it thoroughly (avoid soap – it leaves residue)
- Fill with dechlorinated water
- Place in a well-lit spot
- Ideal temperature: 80-82°F (26-28°C)
2. Getting the Salt Mix Right
This is super important – brine shrimp need brackish water:
- Add 1⅔ tablespoons of salt per quart of water
- Aim for specific gravity of 1.018
- Mix until completely dissolved
3. Adding the Eggs
Don’t just dump them in! Here’s what to do
- Turn off air pump
- Use about ½ teaspoon eggs per quart
- Sprinkle eggs gently on water surface
- Let them hydrate for 1 hour
- Turn air back on
4. The Waiting Game
Now comes the fun part:
- Keep temperature steady at 80-82°F
- Maintain good lighting
- Check periodically (but don’t disturb too much)
- Eggs should hatch within 24-36 hours
5. Harvesting Your Baby Brine Shrimp
After 24 hours, you’ll see tiny orange swimmers! Here’s how to collect them:
- Turn off air pump
- Wait 5-10 minutes
- Baby shrimp sink to bottom
- Empty shells float to top
- Siphon babies from bottom
- Rinse in fresh water before feeding
Pro Tips from My Experience
- Store eggs in fridge or freezer in airtight container
- Keep pH above 8.0 (add ½ teaspoon Epsom salt per quart if needed)
- Strong aeration won’t hurt – keeps eggs suspended
- Use cone-shaped containers for better results
- Clean equipment between hatches
Common Mistakes to Avoid
- Using flat-bottom containers
- Adding too many eggs
- Inconsistent temperature
- Poor aeration
- Using soap to clean equipment
Troubleshooting
Not getting good results? Check these:
- Water temperature too low?
- Enough salt?
- Good aeration?
- Fresh eggs?
- Clean equipment?
Making It a Continuous Process
For regular feeding:
- Set up multiple hatching containers
- Start new batch every 2-3 days
- Harvest only what you need
- Keep unused live shrimp in fridge (max 3 days)
Final Thoughts
Hatching brine shrimp isn’t rocket science, but it does need attention to detail. Follow these steps, and you’ll have a constant supply of nutritious live food for your fish. Trust me, your fish will thank you!
Remember: Practice makes perfect. Don’t get discouraged if your first batch isn’t perfect – we’ve all been there! Keep at it, and you’ll be a brine shrimp hatching pro in no time.
Need more help? Drop a comment below, and I’ll be happy to help troubleshoot!
Would you like me to explain or break down any part of this guide in more detail?
How to Make Baby Brine Shrimp
The Ziss brine shrimp hatchery is one of the best hatcheries we’ve found on the market. It’s made from strong and high-quality plastic, has built-in ports to insert a thermometer and heater, and is optimized for hatching brine shrimp around the clock if needed. You can make your own hatchery, but if you don’t have a lot of spare materials and tools lying around, this pre-built hatchery will make your life a lot easier.
- Gather the following materials:

- Insert the clear plastic “blender” into the black stand, and screw on the black blender valve into the base of the blender. Place the blender and stand somewhere near a power outlet or power strip.

- Pour in roughly 1.75 liters of room temperature tap water, such that the water level stays about 1.5-1.75 inches (3.8-4.4 cm) below the top rim of the blender. By not filling the water all the way to the top, you can avoid getting brine shrimp eggs stuck on the blender lid. Also, there is no need to dechlorinate the water since it helps dissolve the outer shells of the brine shrimp eggs.

- Cut a 1” piece of airline tubing and use it to connect the rigid tubing to the airline port on the inside of the lid. This allows the rigid tubing to reach the bottom of the hatchery. There is no need to attach the air stone at the end of the rigid tubing because we want larger bubbles to increase circulation and oxygenation for a higher hatch rate.

- Heat the water to 74-82°F (23-28°C) either by heating the entire room, shining a small lamp with an incandescent or halogen bulb, or placing a small heater inside the water. (If you are using a heater, follow the manufacturer’s instructions and wait for it to sit underwater for 30 minutes before plugging it in.)

Make sure the heater’s plug can fit through the largest opening in the middle of the blender lid.
- For the best results, add 2 tablespoons of marine salt to the blender, or you can use 2 tablespoons of aquarium salt if you have hard tap water. (Tip: get a plastic coffee spoon, which measures exactly 2 tablespoons and won’t get rusty in the salt.) If you don’t have marine salt and you have soft water, you can add to ¼ to ½ teaspoon of baking soda to raise the pH or add 1 teaspoon of Epsom salt to raise the GH (for 2 liters of water).
- Add up to 1 tablespoon of brine shrimp eggs. For increased longevity, store the rest of the eggs in the refrigerator (or in the freezer if you don’t plan on hatching the rest of them in the near future).

- Find a location for the air pump so that it can reach a nearby power outlet. Connect a longer length of airline tubing from the air pump to the airline port on the top of the blender lid. Cut this airline tubing into two pieces, and install a check valve in between to prevent water from flooding out of the hatchery. Plug in the air pump and make sure the water in the hatchery is bubbling. (If the pump is running but you can’t feel any air, flip the check valve around.)

This red check valve is properly installed with the colored or horizontal bar facing the green air pump. In the event of a power outage, the check valve prevents water from flooding out of the hatchery.
- Cover the blender with the lid. Slip the red O-ring onto the top third of the thermometer, and insert the thermometer into the thermometer-sized port in the lid. Adjust the height of the O-ring so that the thermometer reaches the water and you can read the temperature.

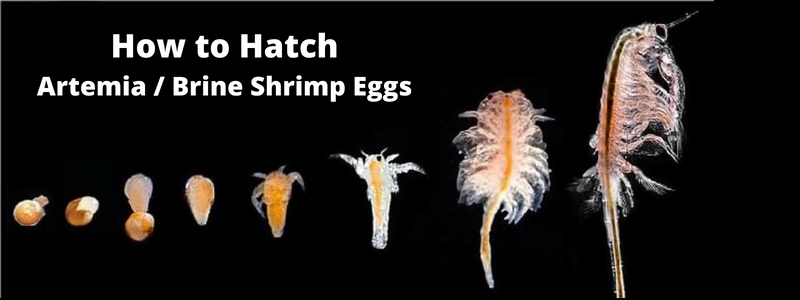
What Are Brine Shrimp?
Have you ever heard of pet “sea monkeys”? They are actually tiny, saltwater crustaceans that belong to the Artemia genus, and they reproduce by laying encapsulated eggs or cysts that can remain viable on dry land for years. These same creatures are also used frequently in the aquarium hobby to feed fish. By rehydrating the cysts in salt water for 18-36 hours, you can hatch baby brine shrimp, which come with highly nutritious yolk sacs that are packed with proteins and healthy fats. If you’re serious about breeding fish, live baby brine shrimp is the #1 recommended fry food used by veteran fish breeders and major fish farms all over the world.

Adult brine shrimp swim upside-down by rhythmically waving their 22 swimming appendages.
How to Hatch Brine Shrimp Eggs the Easiest Way!
FAQ
What do brine shrimp eggs need to hatch?
By rehydrating the cysts in salt water for 18-36 hours, you can hatch baby brine shrimp, which come with highly nutritious yolk sacs that are packed with …
Will brine shrimp eggs hatch in tap water?
Proper preparation of the water we are using to hatch the brine shrimp is essential. If we are using tap water, we must be sure to use a water conditioner, like API® STRESS COAT™, to remove disinfectants such as chlorine and chloramines.
What to do if brine shrimp eggs don’t hatch?
If you realy think they are not hatching at all, you can put some water and bleach in a clear container (i usualy use a drinking glass), add eggs and stirr till they change color. rinse then untill you don’t smell clorine and they are safe to feed as-is.
How long do baby brine shrimp live after hatching?
Harvest the baby brine shrimp (BBS) into a fine mesh net and rinse with fresh water. Divide the harvest from 1 gram of brine shrimp eggs into 3 or 4 shallow dishes (petri dishes) with a saturated brine solution. Place the dishes in the refrigerator. The BBS should remain alive for 2-3 days for later feedings.