Beef tenderloin is considered one of the most tender cuts of beef but it comes at a premium price. Buying a whole untrimmed tenderloin and preparing it yourself can save you a lot of money compared to buying a pre-trimmed center-cut filet. With some simple tools and a bit of know-how, you can turn an untrimmed tenderloin into a beautiful roast ready for the oven.
Why Trim and Tie?
Trimming and tying a tenderloin serves a few purposes:
-
It removes the silver skin, chain, fat and connective tissue that would make the cooked roast less tender.
-
Evening out the thickness creates a roast that will cook evenly since thinner parts won’t overcook.
-
Tying holds the roast in a neat cylindrical shape so it cooks evenly and looks uniform when sliced.
A little hands-on prep yields big rewards in tenderness and presentation.
What You Need
- A 2.5 to 3 lb untrimmed whole beef tenderloin
- A sharp boning knife
- Butcher’s twine
- Paper towels
Step 1: Remove the Chain
The first step is removing the chain, which is the thin “tail” connected to the tapered side of the tenderloin. Simply peel it off the tenderloin, then trim off any fat or membrane. The chain can be saved for stir-fries.
Step 2: Remove the Silver Skin
The silver skin is the thin, silvery connective tissue encasing the tenderloin. Removing it prevents the roast from curling during cooking.
Start by sliding the knife under the skin near the middle. Pull the skin taut while slicing under it, angling the knife tip toward the skin. Once you’ve freed an edge, slide the knife under the skin across the length of the roast, again pulling it taut as you cut. Repeat this motion until all the silver skin is removed.
Step 3: Trim Away Fat and Membrane
Use the knife tip to remove any remaining fat deposits or connective tissue, especially around the fattier areas. Be careful not to remove too much meat.
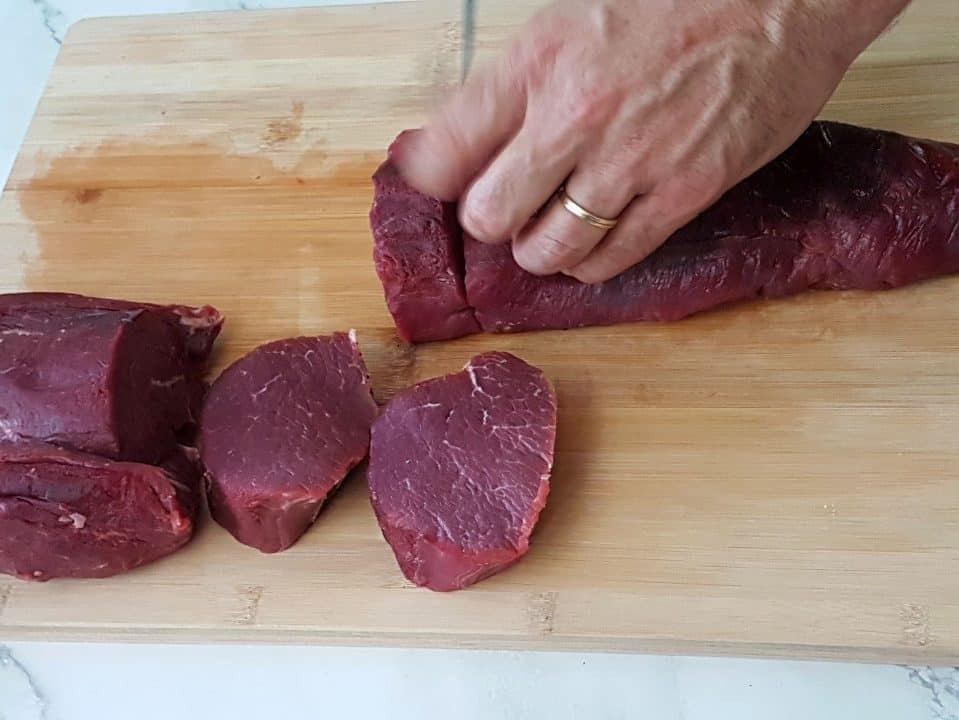
Step 4: Isolate the Center-Cut
The most evenly shaped section of a tenderloin is the center-cut. After trimming, this should be a 2 to 2.5 lb chunk from the thick middle section.
Trim off the narrow “tail” end and the wider portion attached to the fattier side. Reserve these for other uses like stir-fries.
Step 5: Tie the Roast
To ensure even thickness, tuck the tapered end under itself. Use butcher’s twine to tie at 1-inch intervals, tying with a butcher’s knot.
Tying into a neat cylinder means your tenderloin will hold its shape while roasting.
Additional Tips
-
Chill the tenderloin for easier slicing and trimming.
-
Save scrap pieces for quick-cooking dishes like stir-fries.
-
For more stability, tie between each knot as well.
-
Let roast sit at room temp 30 minutes before cooking for more even cooking.
-
Dry thoroughly with paper towels before seasoning and searing.
-
Use a meat thermometer and remove from oven at 120°F for medium-rare doneness.
Get Ready to Roast
With some simple tools and about 15 minutes of hands-on work, you can turn a whole tenderloin into a showpiece roast. Removing the silver skin, connective tissue and uneven portions results in incredibly tender and buttery beef. Trussing into a neat cylinder means perfectly cooked meat. Serve your tied tenderloin with a red wine reduction or béarnaise sauce for an elegant entrée. Your guests will be impressed with your skill at the art of meat preparation.
Trimming Off Excess Fat
:max_bytes(150000):strip_icc()/__opt__aboutcom__coeus__resources__content_migration__serious_eats__seriouseats.com__s__2014__12__20141209-how-to-trim-tenderloin-03-528ba3d5b3b64feaa9ec73666ef8d751.jpg)
Once the connective tissue is removed, trim away the small pockets of fat (theyre hidden near where the tenderloin was attached to the inside of the spine).
The whole beef tenderloin
This is what a whole beef tenderloin looks like. The thin end is like a tail, and the thick end has big flappy bits on the sides (yes, this is the professional terminology I use throughout this post).

The tenderloin pictured weighs 1.8 kg (3.5lb) and has been trimmed of excess fat (sometimes they come with a layer of fat covering the whole piece). But it still has the silver skin on it, which is the thin transparent layer than looks silver (hence the name), which we remove in step 2.
Economical whole beef tenderloin is typically sold in vac packs because it extends the shelf life which means it can be sold at a better price. It will be wet and slippery, so dry it off with paper towels so it’s easier to handle.
Tying Beef Tenderloin⎢Martha Stewart’s Cooking School
FAQ
Does a beef tenderloin need to be tied?
When roasting the whole tenderloin, it’s very important to tie it along the whole piece. This will create a more uniform thickness throughout the whole tenderloin and help it cook more evenly.
What if I don’t have butchers twine for beef tenderloin?
Silicone Bands – Hot bands also known as silicone cooking bands, can replace kitchen twine or toothpicks when cooking.
Do you cook beef tenderloin with the string on?
Cooking it on its own can cause it to sag and turn misshapen as it cooks, so I always like to truss a tenderloin by tying it up at even intervals.
Can You trim a beef tenderloin?
Although trimming a beef tenderloin may initially seem difficult, with some practice and the right equipment, it’s actually quite simple. In addition to saving money on pricey cuts like filet mignon and chateaubriand, trimming your own tenderloin is a great way to ensure a lovely appearance and even cooking.
How do you cut a beef tenderloin?
Trim the entire tenderloin as you normally would. Use your fingers to peel back the topmost layer of fat to identify the seam that distinguishes the chain from the main tenderloin. Run your knife along this seam to cut away the chain. Slide your knife between the layer of fat called the silver skin and the main tenderloin.
How do you tie a beef tenderloin?
Begin by passing the twine under the meat on the tacked-in tail end. Take the twine around the meat and tie a butcher’s knot (which is simply a slipknot), then secure that with a basic knot. Now cut the excess twine. Tie the second loop in the same way about one inch from the first. Repeat this until you reach the end of the tenderloin.