Have you ever bitten into a perfectly golden, crispy piece of meat that’s somehow still incredibly juicy inside? If you’ve experienced this culinary delight, chances are you’ve enjoyed a chicken schnitzel. This popular dish has made its way around the world, winning hearts and satisfying appetites from Austria to Egypt, Israel to Australia.
I’m excited to share everything you need to know about this incredible dish – from its fascinating history to the perfect recipe that’ll have your family begging for seconds. Let’s dive into the wonderful world of chicken schnitzel!
The Origins and History of Chicken Schnitzel
Chicken schnitzel is essentially a variation of the classic Wiener schnitzel, which originated in Austria. The term “schnitzel” refers to a boneless meat cutlet that’s pounded thin, breaded, and then pan-fried to crispy perfection.
While the original Wiener schnitzel traditionally uses veal, chicken has become an incredibly popular alternative that’s more accessible and often more affordable.
The history of schnitzel is actually quite fascinating and somewhat disputed. According to some sources, the dish came from Italy to Austria, though the details are a bit fuzzy. One tale suggests that breaded veal cutlets from Milan were so enthusiastically described by an Austrian general that Emperor Franz Joseph immediately ordered his chefs to duplicate it.
But here’s where it gets interesting – those Milanese-style cutlets didn’t actually originate in Milan! Some historical accounts suggest the Spanish had borrowed the idea from Arabs Talk about a well-traveled dish!
Today, it seems that nearly every country has developed its own version of schnitzel. It’s particularly popular in:
- Austria (the birthplace of Wiener schnitzel)
- Germany (where both pork and chicken versions are common)
- Israel (where chicken schnitzel is a staple)
- Egypt (where it’s been a common family meal for generations)
What Makes a Perfect Chicken Schnitzel?
At its core, chicken schnitzel is beautifully simple – it’s a boneless chicken cutlet (usually breast) that’s been pounded thin, breaded with a crispy coating, and pan-fried until golden brown. But achieving that perfect balance of crispy exterior and juicy, tender interior takes a bit of know-how.
The perfect chicken schnitzel should have
- A thin, even thickness (usually about 1/8 to 1/4 inch thick)
- A crispy, golden-brown coating that doesn’t fall off when cut
- Juicy, tender meat that remains moist after cooking
- A subtle seasoning that enhances but doesn’t overpower the chicken
Essential Tips for Making Chicken Schnitzel
After studying various recipes and techniques, I’ve gathered these essential tips that’ll help you create restaurant-quality chicken schnitzel at home:
1. Pound the Chicken Properly
This is honestly THE most important step! Chicken breasts are naturally uneven in thickness, which can lead to some parts being overcooked while others remain raw. Using a meat mallet (or the back of a heavy cast iron skillet in a pinch), pound your chicken to an even thickness of about 1/8-inch.
Many chefs recommend placing the chicken between plastic wrap or wax paper before pounding. This prevents the chicken from tearing and keeps your kitchen cleaner.
2. Season the Chicken Directly
For maximum flavor season the chicken directly before dredging. While some recipes mix the seasonings with the flour applying them directly to the chicken ensures better flavor penetration. Common seasonings include
- Kosher salt and black pepper
- Garlic powder or garlic salt
- Paprika
- Dried herbs like oregano
3. Set Up a Proper Dredging Station
Organization is key for the breading process! Set up three shallow bowls:
- Bowl 1: Flour mixed with seasonings
- Bowl 2: Beaten eggs (sometimes with a splash of water or milk)
- Bowl 3: Breadcrumbs (panko breadcrumbs give the crispiest results)
4. Get the Oil Temperature Right
The oil needs to be hot enough (shimmering but not smoking) to create that perfect crisp exterior. If the oil isn’t hot enough, the chicken will absorb too much oil and become soggy. Too hot, and the coating will burn before the chicken cooks through.
Extra virgin olive oil works well, contrary to popular belief about its smoke point. Light olive oil, canola oil, or any high-heat cooking oil are also good options.
5. Don’t Skip the Final Touches
Two final elements make a huge difference:
- Sprinkle with salt immediately after frying when the schnitzel is still hot
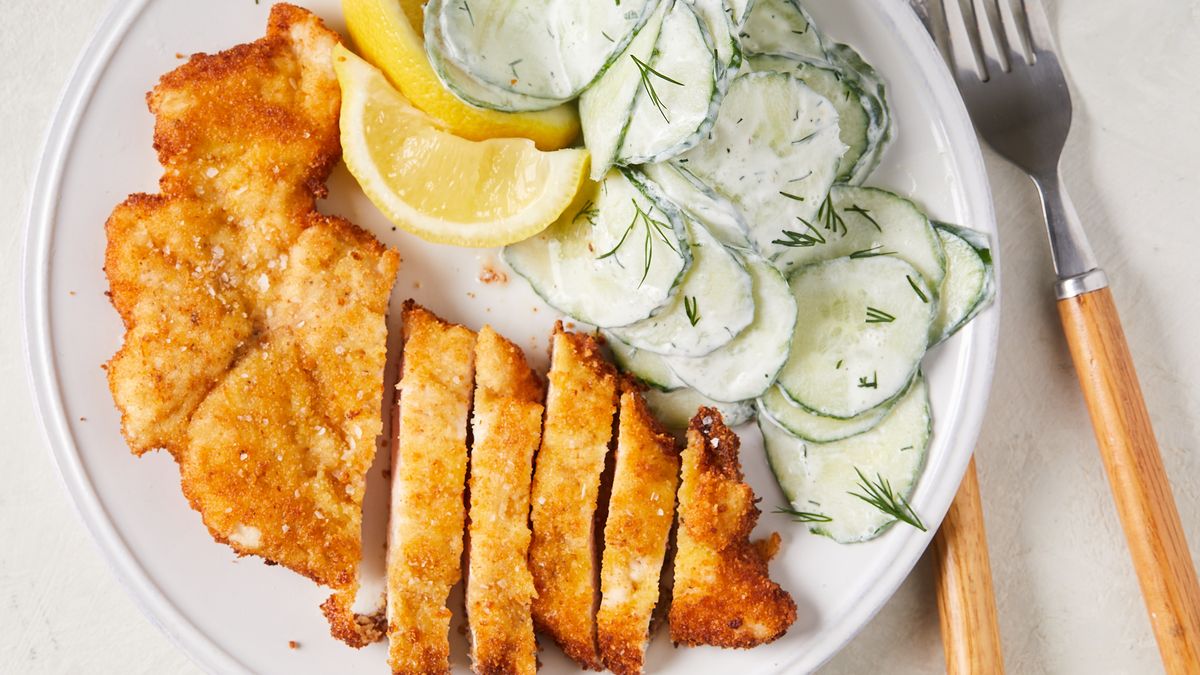
- Squeeze fresh lemon juice over the schnitzel just before serving
Chicken Schnitzel Recipe (Ready in 15 Minutes!)
Now, let’s put all that knowledge to use with this crowd-pleasing recipe that’s ready in about 15 minutes!
Ingredients:
- 4 boneless skinless chicken breasts (about 1.5 pounds)
- Kosher salt and freshly ground black pepper
- 1/2 tablespoon garlic powder
- 1/2 tablespoon sweet paprika
- 1 teaspoon dried oregano
- 1/2 cup all-purpose flour
- 2 large eggs
- 2 tablespoons water
- 1 1/2 cups panko breadcrumbs
- Extra virgin olive oil for frying
- Lemon wedges for serving
- Fresh parsley for garnish (optional)
Instructions:
-
Prepare the chicken: Place chicken breasts one at a time in a large ziplock bag or between two sheets of plastic wrap. Using a meat mallet or heavy skillet, pound to an even 1/8-inch thickness. Cut each flattened breast in half to make more manageable pieces.
-
Season the chicken: Season both sides of each chicken piece with salt and pepper. In a small bowl, mix garlic powder, paprika, and oregano, then sprinkle this mixture evenly over both sides of the chicken.
-
Set up your dredging station: Arrange three shallow bowls. In the first, combine flour with a pinch of salt and pepper. In the second, beat eggs with 2 tablespoons of water. In the third, place the panko breadcrumbs.
-
Bread the chicken: Dredge each piece of chicken first in the flour (shaking off excess), then into the egg mixture (letting excess drip off), and finally into the breadcrumbs, pressing gently to adhere. If time permits, let the breaded cutlets rest for 10 minutes to help the coating stick better.
-
Fry the schnitzel: Heat a large skillet over medium heat and add enough oil to coat the bottom (about 3 tablespoons). When the oil is shimmering but not smoking, add a few chicken pieces, being careful not to crowd the pan. Cook for 3-4 minutes per side until golden brown and crispy. Reduce heat if browning too quickly.
-
Drain and season: Transfer cooked schnitzel to a paper towel-lined wire rack or plate. Immediately sprinkle with salt. Repeat with remaining chicken, adding more oil as needed.
-
Serve: Arrange schnitzel on plates, garnish with parsley if desired, and serve with lemon wedges for squeezing over the top just before eating.
Variations to Try
One of the great things about chicken schnitzel is how versatile it is. Here are some variations to keep things interesting:
Different Coatings:
- Add 1 cup of grated Parmesan cheese to your breadcrumb mixture
- Mix in fresh herbs like parsley or basil with the breadcrumbs
- Add 3 tablespoons of Dijon mustard to your egg mixture
Different Cuts:
- Try using boneless chicken thighs instead of breast for a richer flavor
- Some recipes even use chicken tenders for smaller, kid-friendly portions
Gluten-Free Option:
- Substitute regular flour with gluten-free flour
- Use crushed gluten-free corn flakes instead of panko breadcrumbs
What to Serve with Chicken Schnitzel
What you serve alongside your chicken schnitzel can transform it from a simple dinner to a memorable meal. Here are some perfect pairings:
Traditional Sides:
- German-style potato salad
- French fries
- Mashed potatoes
- Lemon wedges (absolutely essential!)
Lighter Options:
- Arugula salad with lemon vinaigrette
- White bean salad
- Mediterranean-style coleslaw
- Cucumber and tomato salad
For a Complete Meal:
- Roasted Greek potatoes
- Pesto pasta
- Boiled potatoes with garlic and fresh herbs
- Simple green salad
Storing and Reheating Leftover Schnitzel
If you’re lucky enough to have leftovers (which rarely happens in my house!), here’s how to keep them tasting great:
-
Refrigerate: Store in an airtight container for up to 3-4 days. Pro tip: place them in a single layer with parchment paper between pieces to maintain crispiness.
-
Reheat: Avoid using the microwave as it will make your schnitzel soggy. Instead, preheat your oven to 350°F and place the schnitzel on a wire rack over a baking sheet. Heat for 10-15 minutes, flipping halfway through.
-
Make ahead: You can bread the chicken up to 24 hours in advance and store it in the refrigerator between sheets of parchment paper. This makes dinner prep super quick the next day!
Why Everyone Loves Chicken Schnitzel
I’ve found that chicken schnitzel has universal appeal. Kids love it because, well, it’s basically a giant chicken tender! Adults appreciate the comforting simplicity and versatility.
One of my favorite stories comes from a chef who mentioned that her 6-year-old daughter was so impressed with her chicken schnitzel that she got up mid-dinner to give her mom a hug, saying “Thank you for making me this chicken, Mom.” Later that night, the little girl even remembered to thank God for the tasty chicken in her prayers. Now that’s a successful recipe!
Final Thoughts
Chicken schnitzel may have traveled a winding path through culinary history, but its enduring popularity speaks to its simple yet irresistible appeal. Whether you’re cooking for picky kids or sophisticated dinner guests, this crispy, juicy dish rarely disappoints.
The beauty of chicken schnitzel lies in its accessibility – you don’t need fancy ingredients or professional equipment to make it. Just follow the tips I’ve shared, and you’ll have a restaurant-quality meal on your table in minutes.
So next time you’re wondering what to do with those chicken breasts in your fridge, consider transforming them into golden, crispy schnitzels. With a squeeze of fresh lemon and your favorite sides, you’ll have a meal that’s sure to become a regular in your dinner rotation.
For the garlic mayonnaise
- 2 garlic cloves, finely chopped
- 2 egg yolks
- 1 tsp mustard
- 250ml/9fl oz sunflower or groundnut oil
- squeeze lemon juice or a few drops vinegar
- 300g/10½oz red cabbage, shredded
- 1 carrot, julienned
- 1 small onion, finely chopped
- 2 crisp eating apples, peeled, cored and finely chopped
- 1 tbsp lemon juice
- 1 tsp caraway seeds
- 2 tsp cider vinegar
- 2 tbsp garlic mayonnaise (see above)
- pinch caster sugar
- For the chicken, put the flour on a large plate. Mix in the smoked paprika, mustard powder and ½ teaspoon salt. Put the eggs in a shallow bowl and mix the breadcrumbs and sesame seeds together in another shallow bowl. Coat each chicken breast with the flour mixture and pat off any excess. Dip in the egg and then the breadcrumb mixture. Set aside.
- Pour the oil into a large frying pan until 2cm/¾in deep. Heat to a medium temperature. (CAUTION: hot oil can be dangerous. Do not leave unattended.) This is important â too hot and the outside will burn before the chicken is cooked, too cool and the coating will just absorb the oil. To test, add a cube of bread to the hot oil, it should be crisp and golden-brown after 2-3 minutes.
- Fry the chicken for 3-4 minutes on each side, or until deep golden-brown. You may have to do this in batches â if so, keep the cooked chicken warm in a low oven and make sure the oil returns to a medium heat before you cook the second batch.
- For the garlic mayonnaise, mash the garlic to a paste with a little salt. Put in a bowl with the egg yolks and mustard and mix well. Start drizzling in the oil, a few drops at a time, whisking constantly, until you have an emulsion. Keep adding the oil, very gradually, until you have incorporated it all. If the mayonnaise is becoming greasy or too thick to work with, add a few drops of warm water and whisk thoroughly before adding any more oil. Taste, and add more seasoning and a squeeze of lemon or vinegar if it needs acidity.
- For the coleslaw, put the red cabbage, carrot and onion in a bowl. Toss the apple in the lemon juice to stop it from browning, and add this to the cabbage. Sprinkle in the caraway seeds and mix thoroughly. Whisk the vinegar with 2 tablespoons garlic mayonnaise, the sugar and salt and pepper to taste. Pour this over the coleslaw and stir well. Keep the remaining mayonnaise in the fridge, either in a jar or covered with cling film.
- Serve the schnitzel with the coleslaw alongside.
Any leftover mayonnaise will keep in the fridge for 1-2 days. You can substitute 2 tbsp mayonnaise and half a garlic clove, crushed, for the homemade mayo.
To play this video you need to enable JavaScript in your browser.
This video can not be played
The Legend of the Wiener Schnitzel
FAQ
What is chicken schnitzel made of?
Chicken schnitzel is made from a thinly pounded chicken breast that is seasoned, dredged in flour, dipped in egg, and then coated in breadcrumbs, before being pan-fried until crispy and golden brown. While the chicken is the primary component, the dish also includes the flour, egg, and breadcrumbs that form its signature coating, often seasoned with salt, pepper, and herbs, and is cooked in oil or a combination of oil and butter.
What’s the difference between breaded chicken and schnitzel?
The main difference is that schnitzel chicken is made by pounding chicken breasts until they’re very thin, whereas breaded chicken is often left thicker. In addition, schnitzel is most commonly pan-fried, whereas breaded chicken can be either pan-fried or deep-fried.
What the heck is a schnitzel?
Schnitzel is a popular German dish, typically made from thinly sliced meat, most commonly pork, but also veal or chicken. The meat is pounded to tenderize it, coated in flour, dipped in egg, and then breaded with breadcrumbs before being fried until golden brown.
What is schnitzel called in America?
United States
Chicken-fried steak, also called country-fried steak, is nearly identical to schnitzel. It is a breaded and deep-fried beef steak.