Ever found yourself staring at a package of chicken legs, wondering exactly how long to cook them on the stove? You’re not alone! As a home cook who’s made this dish countless times (with both successes and failures), I’m here to share everything I know about perfecting stovetop chicken legs.
Cooking chicken legs on the stove is one of my favorite weeknight dinner solutions They’re economical, flavorful, and can be ready in about 30-40 minutes with minimal fuss. Let’s dive into the details so you can achieve that perfect balance of crispy skin and juicy meat every time
Quick Answer: Chicken Leg Cooking Time on Stove
For those who just want the basic timing:
- Total cooking time: 30-40 minutes
- Initial browning: 8-10 minutes per side on medium-high heat
- Finishing stage: 12-15 minutes covered on medium-low heat
But the perfect chicken leg deserves more attention than just timing! Let’s break down the entire process.
Understanding Chicken Legs
Before we start cooking it helps to know what we’re working with
Types of Chicken Legs
- Whole chicken legs: Include both thigh and drumstick, ideal for roasting or frying
- Drumsticks: The lower section of the chicken leg, cook faster and great for grilling
- Thighs: Meatier and more flavorful, perfect for braising or slow cooking
Nutritional Benefits
Chicken legs aren’t just tasty – they’re nutritious too
- Protein: About 28g per 3.5-ounce serving
- Vitamins: Rich in B vitamins (B6 and B12)
- Minerals: Contains phosphorus and selenium
- Fats: Higher in fat than chicken breast, but mostly unsaturated
Step-by-Step Guide to Cooking Chicken Legs on the Stove
1. Preparation Phase
The key to perfect chicken legs starts before they ever hit the pan:
Thawing
Make sure your chicken legs are completely thawed. Cooking from frozen will lead to uneven results and potential food safety issues.
Patting Dry
This step is crucial! Use paper towels to thoroughly pat the chicken legs dry. This removes excess moisture which is essential for achieving crispy skin.
Seasoning
I always season generously with:
- Salt and pepper (the basics)
- Garlic powder or granules
- Onion powder or granules
- Paprika (smoked paprika adds amazing flavor)
- Optional: dried herbs like thyme, rosemary, or parsley
Tip: While not necessary, marinating for 30 minutes to overnight in the refrigerator will enhance flavor. I’ve found even a quick 30-minute marinade makes a difference!
2. Selecting the Right Pan
The pan you choose matters more than you might think:
- Best option: Heavy-bottomed skillet (cast iron or stainless steel)
- Size matters: Use a skillet large enough for chicken legs to fit in a single layer
- Avoid overcrowding: This lowers pan temperature and steams rather than browns
I personally prefer my cast iron skillet for the even heat distribution and the amazing crust it creates.
3. The Cooking Process
Now for the main event – cooking those chicken legs to perfection!
Browning Phase (16-20 minutes)
- Heat 1-2 tablespoons of oil (vegetable, olive, or coconut work well) in your skillet over medium heat
- Place chicken legs in the pan with the skin side down first
- Cook for 8-10 minutes until golden brown and crispy
- Flip and cook the other side for another 8-10 minutes
Important tip: Don’t rush this step! The browning creates flavor and that desirable crispy skin.
Finishing Phase (12-15 minutes)
- Add about 2 cups of water to the pan (this helps cook the chicken through)
- Reduce heat to medium-low
- Cover the pan with a lid
- Cook for approximately 12-15 minutes until the water evaporates and the chicken is fully cooked
This two-stage approach ensures you get both crispy exterior and tender, juicy meat.
4. Checking for Doneness
Safety first! Here’s how to know your chicken legs are properly cooked:
- Temperature: Use a meat thermometer to verify the internal temperature has reached 165°F (74°C)
- Visual check: Juices should run clear when chicken is pierced, not pink
- Texture test: Meat should pull away from the bone easily
If you’re not sure, always cook a bit longer. Better safe than sorry!
5. Resting the Chicken
After all that cooking, don’t skip this crucial final step:
- Let chicken legs rest for 5-10 minutes before serving
- This allows juices to redistribute throughout the meat
- Result: Juicier, more flavorful chicken
Common Mistakes to Avoid
In my chicken-cooking journey, I’ve made plenty of mistakes. Learn from them!
- Overcrowding the pan: Cook in batches if necessary
- Cooking on too high heat: This burns the outside while leaving the inside raw
- Skipping the drying step: Wet chicken = steamed chicken, not crispy chicken
- Not using enough seasoning: Chicken legs can handle bold flavors
- Neglecting to rest the meat: This leads to dry chicken as juices run out when cut
Troubleshooting Tips
Even experienced cooks encounter issues. Here’s how to fix common problems:
Chicken Browning Too Quickly
If your chicken is getting too dark too fast, lower the heat immediately and add a splash of water to the pan to slow the browning process.
Still Pink Inside After Cooking
If your chicken legs aren’t fully cooked after the recommended time:
- Add more water to the pan
- Cover and continue cooking on low heat until they reach 165°F
- Check with a thermometer in the thickest part, avoiding the bone
Chicken Sticking to Pan
To prevent sticking:
- Make sure your pan is properly heated before adding chicken
- Use enough oil
- Don’t try to flip the chicken too early – it will release naturally once a crust forms
Delicious Variations to Try
Once you’ve mastered basic stovetop chicken legs, try these variations:
- Lemon Herb: Add lemon slices and fresh herbs during the simmering stage
- Honey Garlic: Mix honey and minced garlic into the pan during the last 5 minutes
- Cajun Style: Use a cajun seasoning blend for your spice mix
- Asian Inspired: Add soy sauce, ginger, and a touch of honey
Serving Suggestions
Chicken legs pair beautifully with:
- Sautéed vegetables
- Mashed or roasted potatoes
- Rice or pasta
- Fresh green salad
Storage Information
Made too many? No problem!
- Refrigerator: Store in an airtight container for up to 5 days
- Freezer: Wrap well and freeze for up to 6 months
- Reheating: Warm in a skillet with a splash of water, in the oven at 350°F for 15-20 minutes, or in the microwave (though this may dry them out)
Final Thoughts
Cooking chicken legs on the stove is truly one of the most rewarding kitchen skills to master. With the right technique – drying thoroughly, seasoning generously, browning carefully, and cooking through properly – you’ll have a delicious meal that’s both economical and impressive.
Remember, the total cooking time of 30-40 minutes breaks down to about 16-20 minutes for browning and 12-15 minutes for the covered cooking phase. But always use the internal temperature of 165°F as your ultimate guide rather than strictly following time.
What’s your favorite seasoning for chicken legs? I’d love to hear your variations in the comments below!

How To Cook Chicken Drumsticks On The Stove:
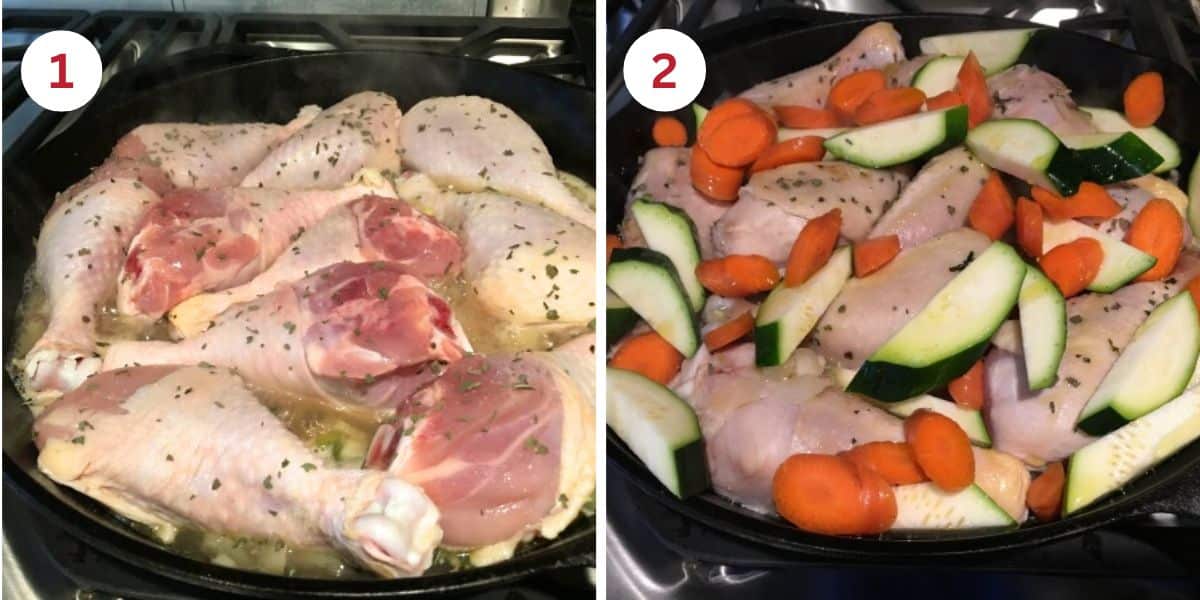
Step 1: Heat olive oil in a 12″ skillet over medium heat. Add chopped onion and minced garlic and cook for 2-3 minutes, just until fragrant and slightly softened.
Step 2: Season the chicken legs on all sides with salt, pepper, and Italian seasoning. Place them in the pan and sear for about 5 minutes per side. This locks in flavor and starts crisping the skin.
Step 3: Scatter in the chopped carrots, zucchini, and any other firm vegetables you’re using. Pour in the chicken broth. Bring to a gentle simmer.
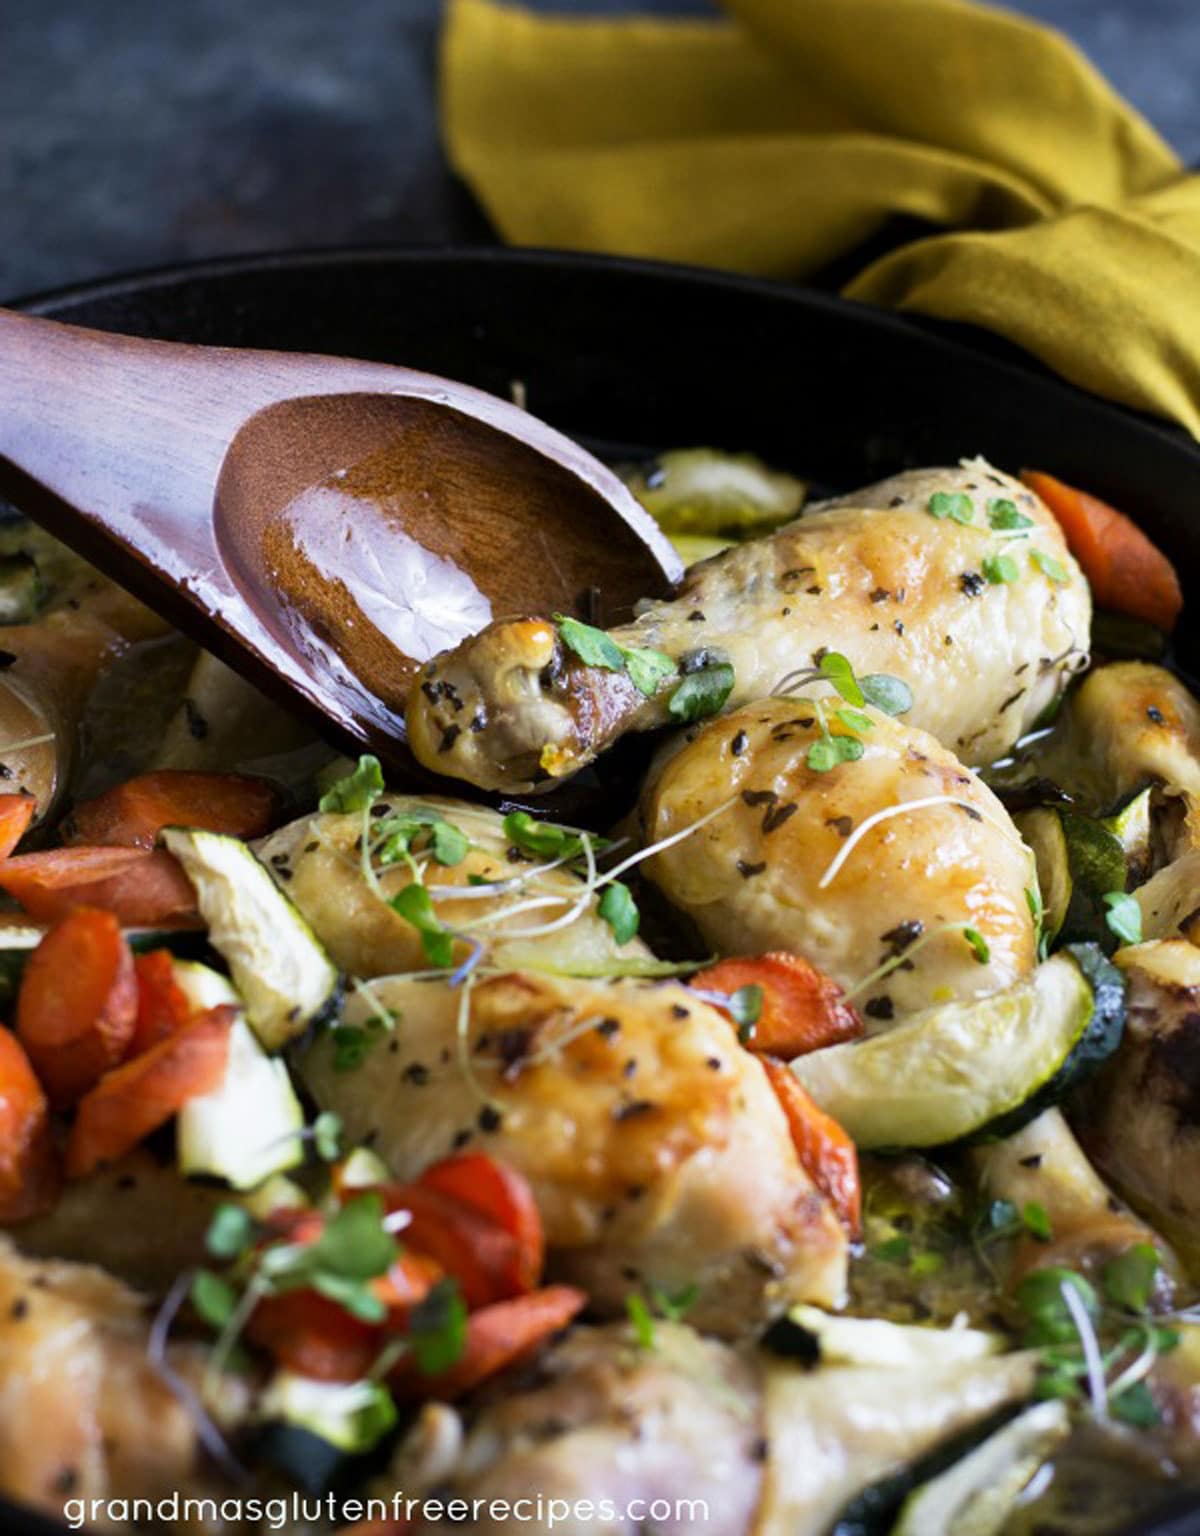
Step 4: Lower the heat and cover the pan. Let everything simmer for another 10-15 minutes, flipping the chicken halfway through, until it reaches an internal temperature of 165º F. The veggies will be tender and infused with flavor.
TIP: Always check the internal temperature of the meat before eating it. Chicken should always be 165º F to ensure it is thoroughly cooked.
If you’re looking for another great chicken leg recipe, try this easy Slow-Cooker Curry Chicken Legs recipe.
Serve these stovetop chicken legs with:
The more veggies, the better! Sweet potatoes, corn, green beans, red peppers, and mushrooms are all good options to add to the pan.
Use a cooking thermometer and insert it into the thickest part of the chicken. You want the chicken to be 165º F. I love this digital cooking thermometer. It is handy in the kitchen and when we cook on our grill, too!
These chicken legs will keep fresh for up to 4 days in an airtight container in the refrigerator or for up to 4 months in the freezer.
Pan Fried Chicken Drumsticks
FAQ
How long does it take to cook chicken legs on the stove?
Cooking time can vary depending on the size and thickness of the chicken legs. On average, it takes about 25-30 minutes to thoroughly cook chicken legs on the stove. However, it’s essential to check the internal temperature to ensure they reach 165°F (74°C) for safe consumption. What is the best temperature to cook chicken legs on the stove?
How to cook a chicken leg?
To cook a chicken leg, first, let it cook on HIGH heat for 7-8 minutes, depending on its size. Then, turn the heat down to LOW, put the lid on, and let it cook for another 7-8 minutes. In the meantime, in a bowl, mix garlic, ginger, scallion, and salt. Heat 3-5 tbsp of Sesame Oil in a separate pan. Once the oil is hot, drizzle it into the bowl and mix everything.
How do you cook chicken legs in a frying pan?
Pat the meat d ry using paper towels. Mix seasoning in a small bowl and rub the parts well to coat all over. Heat the oil in a large pan on the stovetop. Pan fry chicken legs in a single layer in the hot pan for about 4-5 minutes per side on medium heat (1). Use tongs to flip the drumsticks.
Can you cook chicken on the stove?
Cooking chicken on the stove is a quick, versatile, and delicious method that can yield a range of meals from a simple weekday dinner to an impressive dish for guests. However, one of the most common questions home cooks face is: how long should I cook chicken on the stove?
How many chicken legs in a pan?
The lower part of the chicken leg is also known as the drumstick. You will need bone-in, skin-on parts, about 2 – 2 ½ lbs/ 900 g – 1.1 kg, which would be around 6-8 pieces. More than 8 would probably not fit in a regular-sized pan. Remove the skin, if you like, for an even healthier version of this dish; however, we do enjoy the crispy, spicy skin.
Should you cover chicken when cooking on the stove?
Covering chicken while it cooks on the stove can help retain moisture and promote even cooking. When you cover the skillet, you trap steam, which can prevent the chicken from drying out, particularly for lean cuts like chicken breasts. This method can be especially beneficial if you’re cooking thicker pieces that require more time to cook through.
How long do you cook chicken legs in a pan?
Sear over low heat for about 10 minutes, occasionally pressing down for an even sear. Once golden brown, flip and sear the other side for another 7 minutes. Pierce the chicken with a skewer to check for doneness. If the juice is clear, remove from the pan.
How long does it take chicken drumsticks to cook on the stove?
How long does it take to cook chicken feet on the stove?
How long does it take to cook chicken on the stove?