Have you ever wondered why Chinese restaurant chicken is so darn tender? Like, melt-in-your-mouth soft that you just can’t seem to recreate at home? Well, I’ve been there too! After years of disappointing stir-fries with tough, chewy chicken, I finally discovered their secret technique: velveting with baking soda.
This revolutionary method has completely changed my home cooking game, and today I’m gonna share everything I’ve learned about this magical technique with you.
What Is Velveting, Anyway?
Velveting is a traditional Chinese cooking technique that transforms ordinary chicken into incredibly tender, juicy meat. It’s basically a marinating method that uses alkaline ingredients to denature proteins, resulting in that signature silky texture we all love from restaurant dishes
While traditional velveting often involves egg whites, cornstarch and briefly cooking the meat in oil or water before stir-frying, the baking soda method is a fantastic shortcut that delivers amazing results with less effort.
The Science Behind Baking Soda Velveting
So why does baking soda work so well? It’s all about chemistry (don’t worry, I’ll keep it simple!).
Baking soda (sodium bicarbonate) is alkaline, which means it has a high pH. When you apply it to chicken, it raises the pH level on the meat’s surface. This pH change causes the protein molecules to loosen up and unravel slightly.
When proteins are broken apart this way, they don’t contract as much during cooking, which means they don’t squeeze out moisture. The result? Super tender, juicy chicken that stays that way even after cooking.
But there’s a catch – you gotta be careful with how much baking soda you use. Too much and your chicken will turn mushy with an unpleasant metallic or soapy taste Used correctly though, it makes breast meat just as tender as naturally juicier thigh meat
What You’ll Need for Velveting Chicken
Before we get into the step-by-step process, let’s gather our ingredients:
- Boneless, skinless chicken (breast or thighs)
- Baking soda (make sure it’s fresh!)
- Salt
- Optional: sugar, oil, rice wine or dry sherry
- Cornstarch or potato starch
- Water
The equipment is super simple too:
- Cutting board and knife
- Mixing bowls
- Measuring spoons
- Colander (for rinsing)
- Paper towels
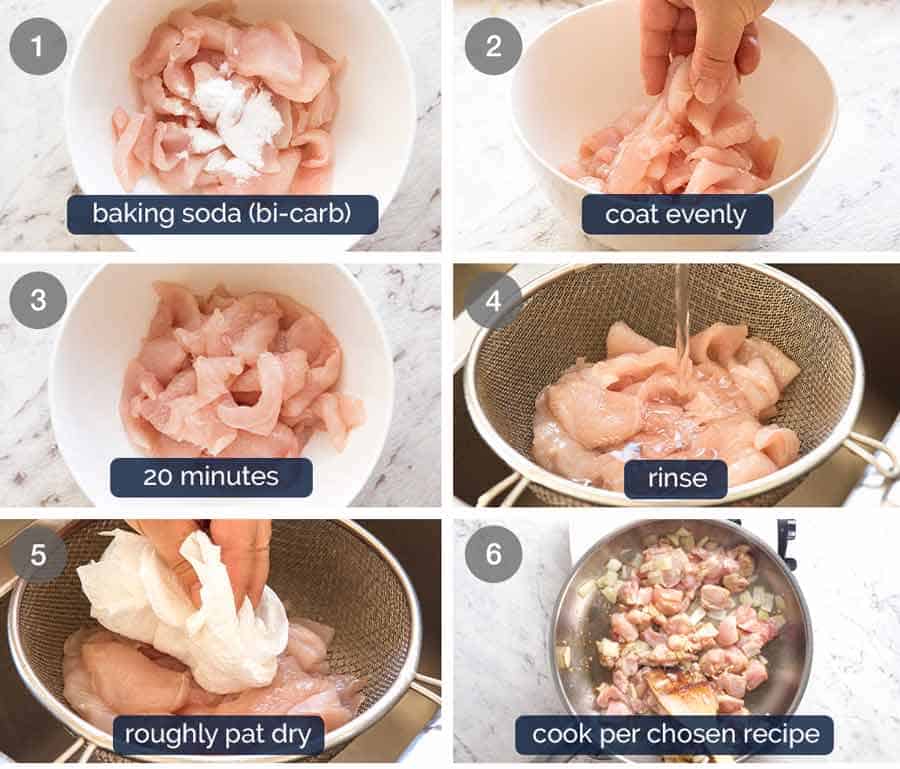
The Step-by-Step Velveting Process
1. Preparing the Chicken
Start by cutting your chicken into uniform pieces. This is important for even cooking! I usually go for bite-sized pieces about ¼ inch thick. If you’re using whole chicken breasts, you might want to pound them a bit first to get even thickness.
Pro tip: cutting against the grain helps break up muscle fibers for even more tenderness.
2. Creating the Velveting Marinade
For each pound of chicken, you’ll need:
- ½ teaspoon baking soda (this is crucial – don’t go overboard!)
- ¼ teaspoon salt (for flavor and additional tenderizing)
- Optional: a pinch of sugar (helps with browning)
- Optional: 1-2 tablespoons of water or rice wine (helps distribute the baking soda)
- Optional: a little oil (prevents sticking during marination)
Mix these together in a bowl until well combined.
3. Marinating the Chicken
Add your chicken pieces to the marinade and mix thoroughly to ensure each piece is evenly coated. This is where the magic happens!
Place the chicken in the refrigerator and let it marinate for at least 30 minutes, but no more than 2 hours. I’ve found that 30-45 minutes usually gives perfect results for chicken breast. If you leave it too long, the chicken can become mushy – and nobody wants that!
4. Rinsing and Drying (Don’t Skip This!)
After marinating, THOROUGHLY rinse the chicken under cold running water. This step is super important because it removes the excess baking soda, which would otherwise give your chicken a weird metallic taste.
After rinsing, pat the chicken completely dry with paper towels. This helps it brown nicely when cooking.
5. Adding the Starch Coating (Optional but Recommended)
For that extra silky texture, toss the dried chicken with cornstarch or potato starch. Use about 1-2 tablespoons per pound of chicken.
The starch forms a protective barrier that helps the chicken retain moisture during cooking and gives it a slight crispiness on the outside.
Cooking Your Velveted Chicken
Now that your chicken is properly velveted, it’s time to cook it! Here are the best methods:
Stir-Frying (My Favorite Method)
- Heat your wok or skillet until it’s smoking hot
- Add a tablespoon of oil
- Add the velveted chicken in a single layer (don’t overcrowd!)
- Cook quickly, stirring occasionally, until just cooked through (about 2-3 minutes)
- Remove and continue with your stir-fry recipe
Deep-Frying
- Heat oil to 350°F (175°C)
- Carefully add velveted chicken
- Fry until golden brown (about 2 minutes)
- Remove and drain on paper towels
Poaching
- Bring a pot of water to a gentle simmer
- Add the velveted chicken
- Cook until just done (about 1-2 minutes)
- Remove and drain well
Whichever method you choose, remember that velveted chicken cooks FAST! Overcooking will undo all your tenderizing efforts.
My Tips for Perfect Velveted Chicken Every Time
After lots of trial and error, I’ve learned some tricks that make a huge difference:
- Use fresh baking soda: Old baking soda loses potency. If it’s been open in your pantry for over 6 months, consider getting a new box.
- Measure precisely: Too much baking soda = mushy, metallic-tasting chicken.
- Don’t skip the rinse: Seriously, rinse thoroughly! This removes the baking soda residue.
- Pat completely dry: Wet chicken won’t brown nicely.
- Cook hot and fast: High heat seals in moisture and prevents overcooking.
- Don’t overcrowd the pan: Cook in batches if needed for even cooking.
- Use a meat thermometer: Chicken is done at 165°F (74°C).
Beyond Chicken: Velveting Other Proteins
The great thing about this technique is that it works on other meats too! Try it with:
- Beef: Great for tougher cuts like flank steak
- Pork: Makes tenderloin even more tender
- Shrimp: Just need 5-10 minutes marinating time
- Fish: Very delicate, so only use a tiny amount of baking soda
Just adjust the marinating time based on the protein’s thickness and density.
Troubleshooting Common Velveting Problems
Sometimes things don’t go perfectly. Here’s how to fix common issues:
Problem: Chicken tastes metallic or soapy
Solution: You used too much baking soda or didn’t rinse well enough. Next time, measure carefully and rinse thoroughly.
Problem: Chicken is still tough
Solution: You might not have used enough baking soda or didn’t marinate long enough. Try increasing to 45 minutes.
Problem: Chicken is mushy
Solution: You marinated too long or used too much baking soda. Stick to 30 minutes and measure precisely.
Problem: Chicken is too salty
Solution: Reduce the salt in your marinade and be mindful of other salty ingredients in your final dish.
Frequently Asked Questions
Can I use baking powder instead of baking soda?
No! These are different products. Baking powder contains baking soda plus an acid, which won’t give you the same tenderizing effect and might make your chicken taste bitter.
Can I velvet chicken in advance and freeze it?
While possible, it’s best to cook velveted chicken fresh. If you do freeze it, thaw completely before cooking.
What if I don’t have rice wine?
Substitute with dry sherry, vodka, or even plain water. The liquid mainly helps distribute the baking soda evenly.
How do I know if I’ve rinsed the chicken enough?
When the water runs clear and doesn’t feel slippery, you’ve rinsed enough. Better to rinse too much than too little!
Can I velvet whole chicken breasts?
Yes! Just make sure to pound them to even thickness first, and you might need to marinate a bit longer (about 45 minutes).
Try This Simple Velveted Chicken Stir-Fry Recipe
Now that you’ve mastered the velveting technique, here’s a simple stir-fry recipe to show it off:
Ingredients:
- 1 pound chicken breast, velveted as described above
- 2 tablespoons vegetable oil
- 2 cloves garlic, minced
- 1-inch piece ginger, minced
- 1 bell pepper, sliced
- 1 carrot, julienned
- 2 cups broccoli florets
- 3 tablespoons soy sauce
- 1 tablespoon oyster sauce
- 1 teaspoon sesame oil
- Cooked rice for serving
Instructions:
- Prepare and velvet the chicken following the steps above
- Heat a wok or large skillet over high heat
- Add 1 tablespoon oil, then cook the velveted chicken until just done (2-3 minutes)
- Remove chicken and set aside
- Add remaining oil, then stir-fry garlic and ginger for 30 seconds
- Add vegetables and stir-fry for 2-3 minutes until crisp-tender
- Return chicken to the wok
- Add sauces and toss to combine
- Drizzle with sesame oil and serve over rice
Final Thoughts
Learning how to velvet chicken with baking soda has been a total game-changer in my kitchen. My stir-fries now taste like they came from a restaurant, and my family always asks for seconds!
The best part is that once you get the hang of it, this technique takes almost no extra time but makes a HUGE difference in your results. It’s one of those cooking secrets that seems small but completely transforms your food.
So next time you’re planning a stir-fry or any dish with chicken, take those extra few minutes to velvet it first. I promise you won’t regret it! Your taste buds (and impressed dinner guests) will thank you.
Have you tried velveting chicken before? What were your results like? I’d love to hear about your experiences in the comments!
How to make velveted chicken


Thinly slice your chicken breast against the grain into thin strips.


Add the chicken to a bowl with cornstarch and water and massage the chicken until it absorbs most of the water. Then add the remaining seasonings and stir until well combined.
What is Velveting Chicken?
This is a secret so many Chinese restaurants use to create the best chicken texture in their dishes. Not only does it tenderize the chicken it also adds extra flavor and moisture to the chicken making it incredibly juicy and flavourful too.