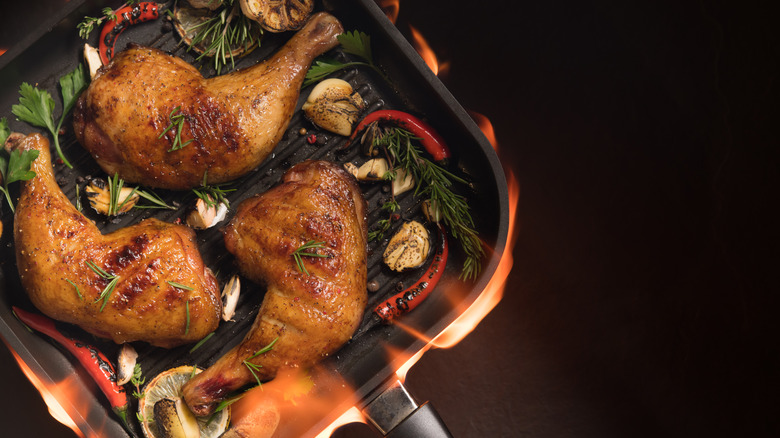
Ever tried grilling chicken only to end up with dry, overcooked meat on the outside and raw centers? Yeah, me too. That’s why I’ve become obsessed with Alton Brown’s famous “ring of fire” grilling technique. This method is pure genius – it creates that beautiful char we all crave while keeping the chicken incredibly juicy inside.
I’ve spent way too many weekends testing this method, and I’m excited to share everything I’ve learned about Alton’s scientific approach to grilled chicken. Trust me, this technique is a game-changer for your backyard cookouts!
Why Alton Brown’s Method Works Better
Alton Brown isn’t just another celebrity chef – he’s known for his scientific approach to cooking. His bi-level cooking method creates two distinct heat zones:
- A super hot direct heat zone for searing and developing color
- A cooler indirect heat zone for gentle, even cooking
This combination ensures you get that gorgeous mahogany exterior without drying out the meat. It’s basically the best of both worlds!
Step-by-Step Guide to Alton’s Ring of Fire Chicken
1. Choose the Right Chicken Pieces
Alton prefers using bone-in, skin-on chicken thighs rather than breasts. Why? Thighs have:
- More fat content that keeps meat juicy
- Connective tissue that melts into flavor
- Bones that help retain moisture
For his complete ring of fire recipe. Alton cuts a 4-5 pound broiler-fryer chicken into 6 specific pieces
- 2 legs
- 2 thighs
- 2 breast halves (with drumettes)
I’ve tried both options and honestly prefer the whole cut-up chicken because you get variety for different preferences.
2. Brine the Chicken
Don’t skip this step! Brining is essential for flavor and juiciness. Alton’s brine recipe is simple
- 1 quart water
- 1/2 cup honey
- 3/4 cup kosher salt
Just combine these ingredients in a 1-gallon resealable bag with your chicken pieces Shake it vigorously for 1-2 minutes until everything dissolves, then refrigerate for 1 1/2 hours Don’t brine longer or the chicken might become too salty.
3. Apply the Spice Rub
After brining, pat the chicken VERY dry with paper towels. Don’t rinse! Then apply Alton’s signature spice rub:
1 tablespoon curry powder1 tablespoon chili powder2 teaspoons cocoa powder1 teaspoon adobo powder (without pepper)1 teaspoon ground cumin1 teaspoon hot smoked paprikaCombine these spices in a gallon-sized zip bag, add your chicken, and shake until evenly coated. Let the chicken rest on a cooling rack for 30 minutes so the spices can penetrate.
4. Set Up Your Ring of Fire
Here’s where the magic happens! You’ll need:
- Natural lump charcoal (2-3 pounds)
- Charcoal chimney starter
- Heavy-duty aluminum foil (about 8 feet)
- 2 aluminum pie pans
The setup process:
- Start your charcoal in the chimney starter (spritz 2 newspaper pieces with veggie oil for the bottom)
- While it heats, form the aluminum foil into a 9-inch diameter ring
- When coals are hot and ashy (15-20 minutes), place the foil ring on the charcoal grate
- Carefully distribute the hot coals AROUND the outside of the ring
- Place an aluminum pie pan in the center to catch drippings
- Put the cooking grate in place and let it heat for 2-3 minutes
- Lightly oil the grate before adding chicken
This creates your bi-level heat zones – hot direct heat around the edges and cooler indirect heat in the center.
5. The Cooking Process
Alton’s cooking technique is very specific:
- Start by placing all chicken pieces skin-side down over the hot coals around the edge
- Turn legs every 3-4 minutes
- Turn thighs, wings and breasts after 4-5 minutes (you want the skin to blister and darken)
- After about 9-10 minutes total, move breast pieces to the center of the grill
- Cover breasts with the second aluminum pie pan
- After 10-11 minutes, place wings on top of the pie pan
- Lean thighs and legs against the side of the pan away from direct heat
- Continue turning pieces every 2 minutes
- Place finished pieces on top of the pan as they complete cooking
- Total cooking time is approximately 18-20 minutes
The goal is to reach an internal temperature of 155°F in the thickest part of each piece. Yes, that’s slightly lower than the FDA’s 165°F recommendation, but the temperature will continue rising during rest.
6. Rest and Serve
Once the chicken reaches temperature, remove it to a clean bowl and cover with a tea towel. Let it rest for 5 minutes before serving. This resting period is crucial – it allows the juices to redistribute through the meat.
Tips for Grilling Success
- Use a good thermometer: Temperature is everything! Don’t guess.
- Keep adjusting: Rotate the grill grate to expose chicken to hotter/cooler zones as needed.
- Watch for flare-ups: Move chicken away from flames if they occur.
- Be patient: The initial sear takes time to develop properly.
- Don’t skip the rest: Those 5 minutes make a huge difference in juiciness.
Common Mistakes to Avoid
I’ve made plenty of errors trying this method, so learn from my mistakes:
- Using gas instead of charcoal: The technique really needs charcoal’s heat characteristics.
- Skipping the brine: It’s tempting to save time, but the brine is essential for flavor and moisture.
- Not drying the chicken thoroughly: Wet chicken = steamed chicken, not seared chicken.
- Cooking by time alone: Always use a thermometer!
- Lifting the lid too often: Every peek lets heat escape.
Why This Method Makes Juicier Chicken
Alton actually did an experiment with J. Kenji Lopez-Alt that proved starting chicken in a hot pan creates juicier meat than starting in a cold pan. They found that chicken cooked quickly over high heat retained about 10% more moisture than chicken cooked slowly.
This is exactly what the ring of fire method achieves – quick searing followed by gentle, indirect cooking. The result is chicken that retains significantly more moisture.
Equipment You’ll Need
To properly execute Alton’s ring of fire method, you’ll need:
- Charcoal grill (kettle style works best)
- Natural lump charcoal
- Charcoal chimney starter
- Heavy-duty aluminum foil
- 2 aluminum pie pans
- Tongs
- Heat-resistant gloves/mitts
- Instant-read thermometer
- Cooling rack and sheet pan (for resting spiced chicken)
Final Thoughts
Alton Brown’s ring of fire method might seem a bit complex at first, but once you’ve done it a couple times, it becomes second nature. The results are absolutely worth the effort – chicken that’s beautifully charred outside, juicy inside, and packed with flavor.
As Alton himself says, “Food tastes better when you’re hungry.” But I think food tastes even better when it’s cooked perfectly – and this method delivers perfect grilled chicken every time.
Give it a try at your next cookout, and watch your guests fight over the last piece!
FAQ About Alton Brown’s Grilled Chicken
How long does it take to grill chicken using Alton’s method?
Total cooking time is about 18-20 minutes, but you’ll need about 2.5-3 hours including prep, brining, and resting time.
Can I use chicken breasts only?
You can, but Alton prefers thighs since breasts dry out more easily. If using breasts, watch them carefully and move them to indirect heat sooner.
What temperature should the chicken reach?
Alton recommends cooking to 155°F and then resting. The temperature will rise to the safe 165°F during rest.
Can I make this on a gas grill?
It’s possible but challenging. You’d need to create a similar two-zone heating pattern, which is harder to achieve on gas grills.
How do I know when the skin is properly seared?
Look for a dark mahogany color and blistering. The skin should look crisp but not burnt.
Giada De Laurentiis’ Chicken Piccata
In her recipe for chicken piccata, Giada De Laurentiis presents a simple, unfussy version of the Italian American classic. It delivers on the lemony-buttery flavors the dish is known for, with a nice, sharp contrast from the capers. Unsurprisingly, it is a quintessential version of the dish—exactly the kind of chicken piccata you’d find if you looked it up in the dictionary.
De Laurentiis’ chicken piccata comes together in under 40 minutes with just seven ingredients (not including oil, salt, and pepper), making it a great choice for a quick family dinner. Other recipes for chicken piccata I’ve tried have called for wine (as does Alton Brown’s, which we’ll get to in a sec), so I was curious when I saw that it’s not in De Laurentiis’ recipe.
I wondered if using just stock would make the sauce taste a little bland, but the inclusion of a third of a cup of lemon juice keeps the sauce bright and perfectly acidic, amplified even more by the briny capers.
Get Recipe with Title: Giada De Laurentiis Chicken Piccata Recipe

Simply Recipes / Stephanie Ganz
Alton Brown’s Chicken Piccata
Alton Browns chicken piccata deviates from my vision of the dish by including sliced button mushrooms. Brown is by no means the first person to do this, and recently, a crop of mushroom piccata recipes that skip the chicken altogether have been popping up, but his was the first version to include mushrooms that I’ve tried.
I loved the mushrooms so much that I may never go back to a mushroom-less version. They bulked up the dish without feeling superfluous, resulting in a more filling chicken piccata. It’s a smart way to stretch the meal to serve a few more people or provide leftovers.
Also, by using chicken thighs instead of breasts, Brown found a way to deepen the flavors of the dish. I still prefer chicken breasts for piccata, but I appreciated the way the richer thighs balanced the tangy sauce.
Speaking of chicken thighs, I learned a new technique for pounding the chicken for this dish. After seasoning raw chicken thighs with salt and pepper, Brown advises cooks to pound them with a meat mallet in a zip-top bag of flour. Usually, I pound chicken between two pieces of parchment or plastic wrap and then dredge them, but I liked the way this saved a step and created a nice crust on the outside of the chicken.
That said, my biggest quibble with Brown’s recipe was in the method. Brown advises using a very specific pan—an “11-inch straight-sided sauté pan with a tight-fitting lid”—which is probably nice to have but feels unnecessary, as does the instruction to remove and return the chicken to the pan not once but twice.
The dealbreaker was the introduction of raw flour and butter to thicken the sauce at the end. This is called a beurre manié in French, and it’s a somewhat antiquated French technique that you don’t see often because it’s… not great. It’s also superfluous; by timing the recipe a little differently, you can thicken the sauce without the need for extra flour and butter.
Get Recipe with Title: Alton Browns Chicken Piccata Recipe