Have you ever found yourself staring at a package of chicken legs wondering how to transform them into that perfect, mouth-watering BBQ meal? You’re not alone! Grilling chicken legs on a rack is one of those cooking techniques that seems simple but can leave many home cooks scratching their heads. But don’t worry – I’ve got your back with this complete guide to nailing this delicious dish every time.
As someone who’s spent countless weekends perfecting my grilling technique, I can tell you that using a rack for chicken legs is a game-changer. It ensures even cooking, prevents sticking, and helps achieve that perfect balance of crispy skin and juicy meat that’ll have your family and friends coming back for seconds.
Why Use a Rack for Grilling Chicken Legs?
Before diving into the how-to, let’s understand why a rack makes such a difference:
- Even cooking – Elevates the chicken for consistent airflow around all sides
- Less sticking – Prevents the chicken from adhering to grill grates
- Reduced flare-ups – Keeps chicken above direct flames
- Better smoke circulation – Allows smoke flavor to penetrate all around
- Easier turning – No need to individually flip each piece
Trust me, once you try the rack method, you’ll never go back to randomly placing chicken legs on the grill again!
Understanding Chicken Legs
Chicken legs aren’t just delicious – they’re also one of the most forgiving cuts to grill. Let’s break down what we’re working with:
Types of Chicken Legs
Chicken legs consist of two main parts:
-
Drumsticks: The lower portion with a single bone and thick, meaty texture. These have that classic “handle” shape that kids (and adults!) love to grab.
-
Thighs The upper section with more fat content, which means more flavor and moisture during grilling
You can grill either part separately or keep them together as a whole leg quarter. I personally prefer grilling whole legs for family gatherings – they look impressive and stay extra juicy.
Bone-In vs. Boneless
While you can find boneless options I strongly recommend sticking with bone-in chicken legs for grilling on a rack. Here’s why
- Bones conduct heat, helping meat cook more evenly
- They add significant flavor to the meat
- Bone-in pieces are less likely to dry out
- They’re typically more affordable than boneless options
Boneless legs do cook faster (about 20-25 minutes compared to 30-40 for bone-in), but you’ll sacrifice some flavor and juiciness in the process.
Preparing Your Chicken Legs for the Grill
Success on the grill starts with proper preparation. Here’s my step-by-step approach:
Trimming and Handling
-
Start by trimming excess skin and fat using kitchen shears or a sharp knife. Don’t remove all the skin – it helps keep moisture in and crisps up beautifully.
-
Always practice safe food handling with chicken:
- Wash hands thoroughly before and after touching raw chicken
- Use separate cutting boards for chicken and other ingredients
- Clean all surfaces that contact raw chicken with hot, soapy water
Marinades and Seasonings
This is where the magic happens! For truly flavorful chicken legs, you need to season them well. Here are some winning combinations I’ve perfected over the years:
Classic BBQ Marinade:
- 1/2 cup barbecue sauce
- 2 tablespoons apple cider vinegar
- 1 tablespoon olive oil
- 2 cloves minced garlic
- 1 teaspoon smoked paprika
Zesty Citrus Marinade:
- Juice of 2 lemons
- 1/4 cup olive oil
- 3 cloves minced garlic
- 1 tablespoon dried oregano
- 1 teaspoon salt
- 1/2 teaspoon black pepper
Simple Dry Rub:
- 2 tablespoons brown sugar
- 1 tablespoon paprika
- 1 teaspoon garlic powder
- 1 teaspoon onion powder
- 1 teaspoon salt
- 1/2 teaspoon black pepper
- 1/4 teaspoon cayenne (optional for heat)
For best results, marinate your chicken legs for at least 30 minutes, but overnight in the refrigerator is even better. The longer they marinate, the deeper the flavor will penetrate.
Setting Up Your Grill for Chicken Legs
The right grill setup is crucial for perfect chicken legs. Here’s how I recommend doing it:
Choosing the Right Grill
You can use any type of grill for chicken legs on a rack:
- Gas Grill: Offers precise temperature control and convenience
- Charcoal Grill: Provides that classic smoky flavor
- Pellet Grill: Combines convenience with great smoke flavor
I personally use a charcoal grill for the authentic smoky taste, but the techniques work for any grill type.
Creating Temperature Zones
One of the secrets to perfect grilled chicken legs is setting up your grill with different heat zones:
-
For Gas Grills: Turn one side to medium-high heat (about 375-400°F) and the other side to low.
-
For Charcoal Grills: Bank the coals to one side, creating a hot zone and a cooler zone.
This dual-zone setup gives you flexibility during cooking – you can sear over high heat, then move to the cooler side to finish cooking without burning.
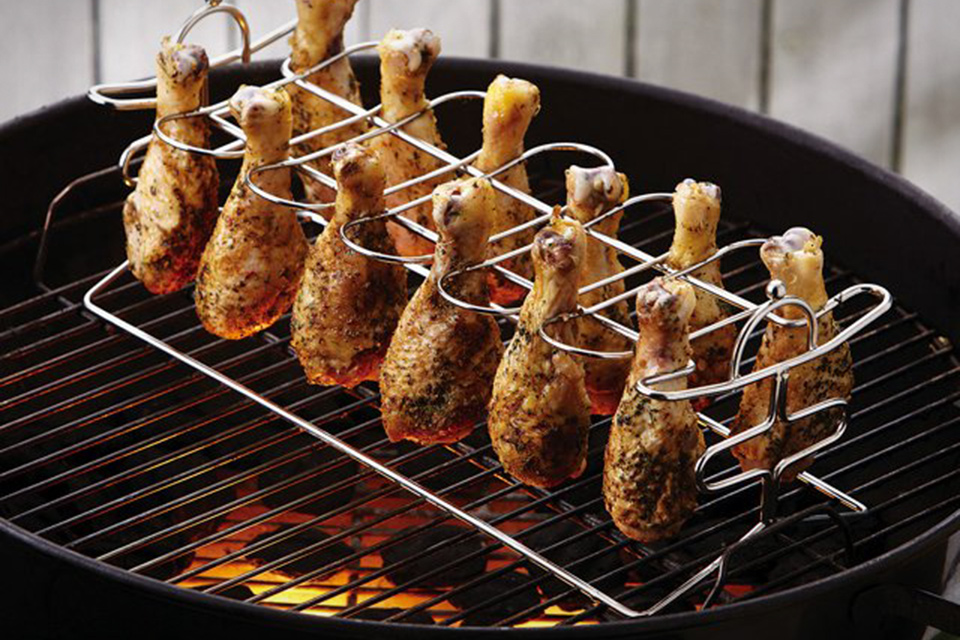
Preparing the Rack
Any grill-safe rack will work, but I prefer a purpose-made chicken leg rack with individual slots. Before placing it on the grill:
- Clean the rack thoroughly
- Spray or brush it with oil to prevent sticking
- Preheat it on the grill for about 5 minutes
The Perfect Grilling Process
Now for the main event – actually grilling those chicken legs! Here’s my foolproof method:
Step 1: Preheat and Prepare
Preheat your grill to medium heat (350-400°F). Make sure your grill grates are clean and lightly oiled.
Step 2: Initial Sear
For the best results, start with a quick sear:
- Place chicken legs directly on the hot side of the grill, skin-side down
- Grill for about 5-6 minutes until you see nice grill marks and browning
- Turn occasionally to prevent burning
Step 3: Move to the Rack
Once seared:
- Transfer the chicken legs to your preheated rack
- Position the rack over the indirect heat zone
- Close the grill lid to maintain consistent temperature
Step 4: Continue Cooking
With the chicken on the rack:
- Grill for about 25-35 more minutes
- Rotate the pieces every 10 minutes for even cooking
- If using a sauce, apply it during the last 5-10 minutes to prevent burning
Step 5: Check for Doneness
This is the most important step! Chicken legs must reach an internal temperature of 165°F to be safe. Here’s how to check:
- Insert an instant-read thermometer into the thickest part of the meat, away from the bone
- Verify temperature reads at least 165°F
- Look for clear (not pink) juices when pierced
- The meat should pull away from the bone easily
If needed, you can move the rack back over direct heat for a few minutes to crisp up the skin at the end.
Timing Guidelines
Cooking times can vary based on several factors, but here are my general guidelines:
| Type | Direct Heat Time | Indirect Heat Time | Total Time |
|---|---|---|---|
| Bone-in Drumsticks | 5-6 minutes | 15-18 minutes | 20-25 minutes |
| Bone-in Thighs | 5-6 minutes | 18-22 minutes | 25-30 minutes |
| Whole Leg Quarters | 5-6 minutes | 25-30 minutes | 30-40 minutes |
| Boneless Legs | 4-5 minutes | 15-20 minutes | 20-25 minutes |
Remember, these are just guidelines – always use a meat thermometer to confirm doneness!
The Crucial Resting Period
This is where a lot of people mess up – they skip the resting period! After removing your chicken legs from the grill:
- Place them on a clean platter
- Tent loosely with foil
- Let them rest for 5-10 minutes
This resting time allows the juices to redistribute throughout the meat, resulting in much juicier chicken. If you cut into the legs immediately, all those flavorful juices will run out onto your plate instead of staying in the meat where they belong.
Common Mistakes to Avoid
Through years of trial and error, I’ve identified the biggest mistakes people make when grilling chicken legs on a rack:
- Not preheating the grill – Always preheat for at least 10-15 minutes
- Skipping the marinade – Even a quick seasoning makes a huge difference
- Cooking only with direct heat – This leads to burnt outsides and raw insides
- Applying sauce too early – Sugar in sauces burns quickly; add in final minutes
- Overcrowding the rack – Leave space between pieces for proper air circulation
- Not using a meat thermometer – Visual cues alone aren’t reliable for safety
- Skipping the rest period – This crucial step ensures juicy results
Serving Suggestions
I love serving grilled chicken legs with complementary sides that enhance the meal:
- Classic coleslaw for cooling crunch
- Grilled corn on the cob
- Baked beans
- Potato salad
- Garden salad
- Cornbread
- Garlic bread
For an extra flavor boost, serve with additional sauce on the side for dipping.
Adding Smoke Flavor
Want to take your grilled chicken legs to the next level? Try adding some smoke:
-
Wood Chips: Hickory, mesquite, apple, or cherry wood all pair beautifully with chicken. Soak chips for 30 minutes before using.
-
Foil Pouch Method: Place soaked chips in an aluminum foil pouch, poke holes in the top, and place directly on heat source.
-
Timing: Add wood chips about 10 minutes before putting chicken on the grill for optimal smoke infusion.
The smoke adds another dimension of flavor that really makes your chicken legs stand out!
Final Thoughts
Grilling chicken legs on a rack isn’t just a cooking method – it’s a way to elevate an everyday protein into something special. With the right preparation, temperature control, and patience, you’ll achieve that perfect balance of crispy skin and juicy, flavorful meat that makes grilled chicken legs so irresistible.
Remember, practice makes perfect. Don’t be discouraged if your first attempt isn’t perfect – each time you grill, you’ll get a better feel for your equipment and timing. Before long, you’ll be the neighborhood grilling expert!
Now it’s your turn – fire up that grill, grab a rack, and transform those chicken legs into BBQ masterpieces. Your taste buds (and impressed guests) will thank you!
FAQ: Grilling Chicken Legs on a Rack
Q: How long does it take to cook chicken legs on a rack in the grill?
A: Generally, it takes about 30 minutes total, rotating every 10 minutes. Always verify doneness with a meat thermometer reading 165°F.
Q: Can you cook chicken on the top rack of the grill?
A: Yes! The top rack is perfect for indirect cooking. It positions the chicken farther from the heat source, allowing for more gentle, even cooking.
Q: What are common mistakes when grilling chicken legs?
A: The biggest mistakes include putting cold, damp chicken on the grill, adding BBQ sauce too soon, under-seasoning, not using a thermometer, and skipping the resting period.
Q: What’s the best way to grill chicken drumsticks?
A: Preheat your grill to medium heat, then place the drumsticks on the grill for about 5-10 minutes, turning occasionally. Move to indirect heat to finish cooking until they reach 165°F internally.
Delicious Chicken Thigh Temp on Grill
Grilled chicken legs and thighs are my family’s go-to summer meals because it is delicious and fancy. Plus, I don’t have to spend all my time in the kitchen preparing these scrumptious grilled legs.
I just love how inexpensive the chicken legs are. With quick preparation, you can prepare a meal that is sure to win everyone’s heart. Plus, a bit of char on the grill gives these chicken legs a summer-like flavor.
Steps to Prepare Grilled Chicken Thighs
Grilling chicken thighs sounds intimidating, but it does not have to be. Here’s everything about the preparation of delicious chicken legs on time.
I have divided the steps into different parts so you don’t make any mistakes:
To prepare BBQ chicken thighs, pat them dry to remove the moisture. It makes the chicken more crispy and juicy.
Then apply a coat of oil on drumsticks. Once done, keep the chicken pieces aside. Take another bowl to mix salt, pepper, and other spices together. Rub the seasoning well to get the optimal flavor.
Also See: How To Grill Beer Can Chicken
You might also like:
Allow the chicken pieces to marinate properly. Putting the pieces in the fridge for marination is even better. Meanwhile, preheat the grill to 400 F. Apply a thick coat of oil so the chicken pieces do not stick while grilling.
Place each chicken drumstick on the grill and cook for about 35 minutes. Flip the chicken pieces frequently. Once cooked, transfer the drumstick to a plate and let it rest.
If you want to get that perfect char effect on the grilled BBQ chicken thighs, apply BBQ sauce and cook on the grill for 25 minutes. Flip the pieces regularly.
- If you have kept the chicken pieces in the fridge for marination or storage, take them out an hour before placing them on the grill.
- Adding spices under the chicken skin lets you get the optimal flavors. Not everyone enjoys eating chicken skin, but if you do, season well under the skin.
- Patting the chicken pieces before coating them with oil and seasoning makes the outside crispy. The meat becomes tender and juicy.
- To add a simple variation to your usual grilled chicken, glaze the pieces with honey. The hot honey-flavored grilled chicken is almost everyone’s favorite.
- Bring out dips while serving sticky BBQ chicken drumsticks.