Ever cooked a chicken and wondered if it’s actually done? Yeah, me too. Getting chicken just right can feel like walking a tightrope – too raw and you’re facing food poisoning, too cooked and you’ve got dry, rubbery meat nobody wants to eat. The solution? A good meat thermometer and knowing exactly where to put it.
I’ve been cooking chicken for years, and I’m gonna share my secrets for getting perfect readings every time. Let’s dive into the most important spots to check your chicken’s temperature and banish undercooked poultry forever!
Why Thermometer Placement Matters
Before we jump into the “where,” let’s talk about why proper thermometer placement is so darn important:
- Safety first: Undercooked chicken can harbor nasty bacteria like Salmonella and Campylobacter jejuni
- Accuracy matters: Wrong placement = wrong reading = potentially unsafe food
- Texture perfection: The difference between juicy, tender chicken and a dry, overcooked disaster
When your thermometer touches bone or isn’t deep enough in the meat, your reading will be completely off This isn’t just annoying – it could make you sick!
Best Places to Put a Thermometer in Chicken
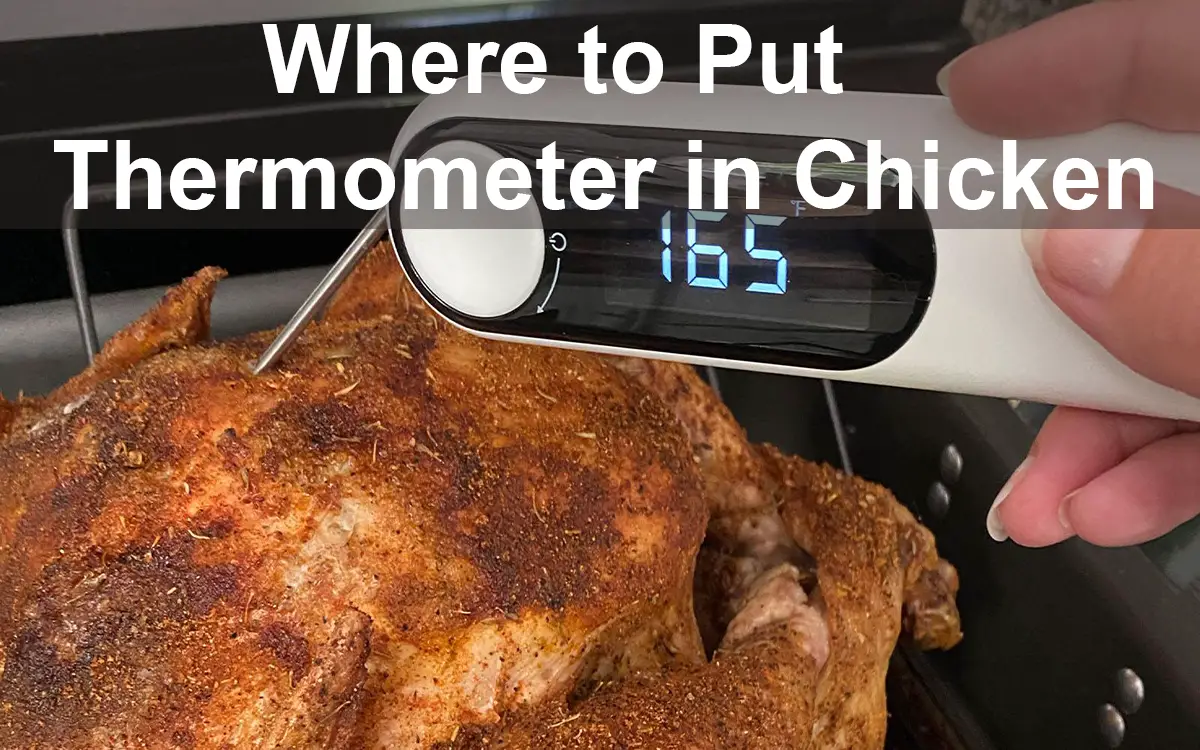
For Whole Chicken
When roasting a whole bird, the most reliable spots to check are
-
The inner thigh near the breast
- This is generally considered the most reliable spot
- Insert the thermometer between the leg and thigh bones
- Make sure you’re in the thickest part of the meat
- NEVER let the thermometer touch bone (bones conduct heat differently)
-
Deep into the breast
- Weber recommends measuring three-quarters along the breast
- Insert through the front of the breast
- Avoid touching any bones
- If the probe touches bone or goes through to the cavity, your reading will be wrong
-
The thickest part of the wing
- Another good spot to check, especially for thorough cooking verification
- Aim for the meatiest section away from bones
For best results with a whole chicken, I recommend checking multiple spots. This helps ensure your entire bird is perfectly cooked, not just one section.
For Chicken Breasts
For boneless or bone-in chicken breasts:
- Insert the thermometer into the thickest part of the breast
- Usually this is the center of the breast
- For bone-in breasts, avoid touching the rib bones
- Fully insert the probe into the meatiest area
For Chicken Thighs and Wings
These cuts can be trickier because they contain bones:
- For thighs: Find the meatiest part of the thigh and insert the thermometer there, avoiding bones
- For wings: Insert the thermometer in the thickest part of the wing
For Stuffed Chicken
If you’re cooking a stuffed chicken, you’ve got an extra step:
- Check the chicken as described above
- ALSO test the center of the stuffing
- Both the meat and stuffing need to reach 165°F for safety
What Temperature Should Chicken Reach?
According to the USDA, chicken is safe to eat once it reaches 165°F (74°C). At this temperature, harmful bacteria are killed off.
However, some chefs argue that chicken (especially breast meat) is optimally juicy at 155°F. While you might prefer the texture at this lower temp, the USDA’s official recommendation is 165°F for safety reasons.
Different parts of the chicken may reach doneness at different temps:
- White meat (breasts): 165°F
- Dark meat (thighs, legs): Some people prefer 175-180°F for better texture
Common Thermometer Mistakes to Avoid
I’ve made plenty of these mistakes myself, so learn from my experience:
- Not inserting deep enough: The probe should be fully embedded in the meat
- Touching bone: This gives false high readings
- Measuring fatty areas: Stick to the meaty portions
- Pulling chicken off heat too early: Wait for the thermometer to finish reading
- Using an uncalibrated thermometer: Test it occasionally in ice water (should read 32°F)
- Not cleaning between uses: This can spread bacteria
Best Thermometers for Checking Chicken
Having a reliable thermometer makes all the difference. Here are some good options:
- Digital instant-read thermometers: These display temperature in just 2-3 seconds
- ThermoPro TempSpike: A wireless option that’s great for monitoring during cooking
- Meat thermometers with long probes: These help you reach the center of thick cuts
I personally love digital thermometers because they’re much faster and easier to read than dial displays.
Alternative Ways to Check Doneness (Not as Reliable)
While a thermometer is always best, sometimes you might find yourself without one. Here are some backup methods:
- Check firmness: Cooked chicken feels firm with no indentations
- Look at the color: Properly cooked chicken is white throughout with no pink
- Check the juices: Clear juices (not red or pink) suggest doneness
- Wiggle test: Bones should move easily when twisted
But honestly, these visual checks aren’t nearly as reliable as using a thermometer. It’s worth investing in a good one!
Pop-up Timers: Friend or Foe?
Many store-bought chickens come with those little pop-up timers, but I don’t recommend relying on them. Here’s why:
- They sometimes pop before the chicken reaches 165°F
- Other times, they pop too late, leaving you with dry, overcooked meat
- I usually remove them before cooking
How Long Should You Cook Chicken?
While temperature is the ultimate guide, here are some rough cooking times:
- Whole chicken: About 1 hour and 40 minutes
- Chicken wings: Around 25 minutes
- Chicken breasts: 25 to 30 minutes (at 350°F)
Remember that white meat cooks faster than dark meat, so timing can be tricky with a whole bird.
Step-by-Step Guide to Using a Thermometer
- Make sure your thermometer is clean and calibrated
- Insert the probe into the thickest part of the meat
- Avoid touching bone or going through to the cavity
- Wait for the reading to stabilize
- Check multiple spots if cooking a whole chicken
- Make sure the temperature is at least 165°F
- If not done, continue cooking and check again
Wrap-Up: Thermometer Placement is Key!
Getting the thermometer in the right spot isn’t rocket science, but it does make a huge difference in your cooking results. For best results:
- Whole chicken: Check the inner thigh near the breast and the deepest part of the breast
- Chicken pieces: Check the thickest part of each piece
- Always avoid bone: This gives false readings
- When in doubt, check multiple spots: Better safe than sorry!
By mastering proper thermometer placement, you’ll never serve undercooked or dry, overcooked chicken again. And trust me, your dinner guests will thank you!
Do you have any chicken cooking tips to share? What’s your favorite way to ensure perfectly cooked chicken? I’d love to hear your thoughts in the comments below!
What’s the Best Smoker Temperature to Use For Chicken?
Smoking a whole chicken is one of our favorite things to do. We use a process called spatchcocking when we smoke chicken that helps the breast meat and thighs cook at a similar rate while ensuring the bird is tender, juicy, and succulent. The ideal smoker temperature should be within 225 degrees to 275 degrees.
Higher temperatures will cook faster, but also might result in overcooked breast meat while the lower temperature may take a long time and could also result in dry breast meat. We prefer to put our smoker at 250 degrees when smoking a whole chicken.
A Chart of Minimum Internal Temperatures for Beef, Poultry, and Other Meats
Everyone has a preference for the best way to cook meat. Some people prefer rare or medium-rare doneness while others want their meat black. Most people prefer beef at a medium-rare or medium doneness, while very few people appreciate poultry or pork that is anything less than well-done.
You should have a chart handy in your cooking area that breaks down the USDA-recommended temperatures for various types of meat and poultry, but we will give you a quick breakdown below.
Beef:
- Medium-rare: 135 degrees
- Medium: 145 degrees
- Well-done: 155+ degrees
Pork:
- Medium-well: 145 degrees
- Well: 155+ degrees
Poultry:
- Minimum: 165 degrees
- Thighs and dark meat are better when cooked to 170-175 degrees
How To Check A Roasted Chicken’s Temperature
FAQ
Is chicken done at 165 or 180?
Where do you measure the temperature of a chicken?
To check chicken temperature, insert a food thermometer into the thickest part of the meat, avoiding any bone, and aim for 165°F (74°C). For a whole bird, this means the innermost part of the thigh and wing and the thickest part of the breast. For pieces, check the thickest part of that piece.
How far to insert meater?
Insert your MEATER probe so the entire temperature-sensitive section, from the tip up to the safety notch, is fully within the thickest part of the meat, away from bone and fat. To achieve this, insert the probe until the meat covers the probe’s surface, stopping before the black ceramic handle, which would indicate the probe has gone too far and could damage the electronics.
Where to put a thermometer in a whole chicken spatchcock?
To check the temperature of a spatchcock chicken, insert a meat thermometer into the thickest part of the breast and thigh, making sure to avoid the bone. The USDA recommends cooking chicken to 165°F, though you can pull it from the oven when it reaches 155-160°F, as the temperature will continue to rise by 5-10 degrees during the rest period (carryover cooking).