Are you tired of constantly refilling your chicken’s water? Dirty water bowls getting knocked over? I’ve been there! After years of raising chickens, I finally found solutions that save time and keep my flock happy and hydrated Today, I’m sharing the easiest and most effective ways to build your own chicken coop watering system
Why You Need a Better Chicken Watering System
Let’s face it – traditional chicken waterers are frustrating. They run out quickly, get filthy with debris, and waste precious space in your coop. When I first started raising chickens, I spent way too much time refilling and cleaning water containers.
A good watering system provides several benefits
- Ensures chickens have clean water 24/7
- Reduces daily maintenance time
- Prevents bacteria growth and disease
- Improves flock health and egg production
- Saves you time and hassle
According to chicken experts, without reliable water your flock can suffer reduced egg production, poor feather quality and increased illness risk. A single chicken drinks about a pint of water daily, so proper hydration is crucial!
Planning Your Chicken Watering System
Before grabbing your tools, take time to plan your system. Here’s what to consider:
- Flock size: Provide at least one watering station for every 5-6 chickens
- Location: Choose an accessible area in the run or coop
- Watering method: Cups, nipples, or traditional waterers
- Reservoir size: A 20-30 gallon container works well for most flocks
- Climate considerations: Plan for freezing temperatures if you live in colder regions
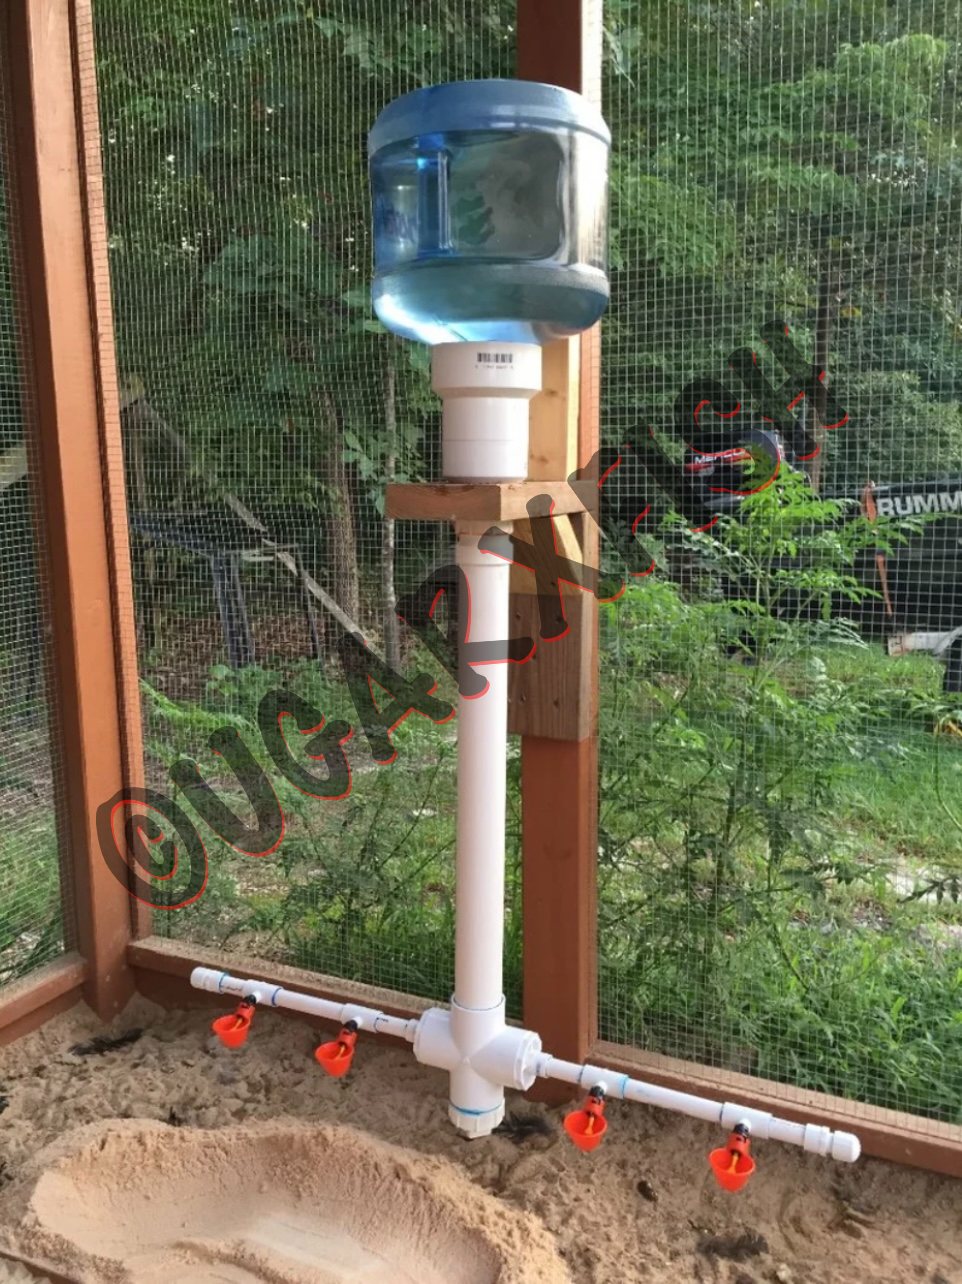
For my chicken tractor, I wanted something that wouldn’t waste space, wouldn’t make a mess, and could move with the tractor. The gravity-fed PVC pipe system with watering cups was perfect!
Materials You’ll Need
The supplies list might look intimidating, but don’t worry! Just take this list to your local hardware store, and they’ll help you gather everything:
- Chicken water cups or nipples (1 per 5-6 chickens)
- 1/2″ PVC pipe and connectors (T-connectors, elbows)
- PVC caps
- Bulkhead fitting and valve
- 20-30 gallon plastic bin (or 5-gallon bucket for smaller flocks)
- Zip ties or velcro straps
- Lumber for reservoir stand
- PVC cutter or saw
- Drill with bits
- Measuring tape
- Optional: insulation/heating supplies for cold climates
The total cost runs about $80 for a complete system, but it’ll last for years and save tons of work!
Step-by-Step Building Instructions
Step 1: Assemble the PVC Pipe Line
- Cut segments of 1/2″ PVC pipe to span your chicken run
- Use T-connectors to join pipe segments
- Install water cup connectors approximately every 2 feet along the line
- Lay out the assembly flat to test the design
I decided to place waterers on both sides of my chicken tractor to prevent crowding and spread manure more evenly.
Step 2: Add Supports
- Place a PVC T-connector with a 12″ vertical pipe every 2 feet for support
- Cap the bottom of support pipes to prevent debris buildup
- This ensures the pipe stays at the proper height
Step 3: Mount the Piping
- Secure the piping to chicken wire using zip ties or velcro straps
- I used velcro straps instead of zip ties so I could remove the pipe for cleaning
- Position the water line about 12-15″ off the ground – perfect height for chickens to drink
Step 4: Install the Water Reservoir
For a 5-gallon bucket reservoir:
- Drill a 1/2″ hole near the bottom of the bucket
- Attach a bulkhead fitting and valve to the hole
- Build a simple stand to elevate the bucket (gravity is your friend!)
- Connect the bucket to your main water line with a short PVC pipe
- Secure the bucket with bungee cords to prevent tipping
For a larger 20-30 gallon reservoir:
- Follow the same steps but place the container on a sturdier stand
- This larger reservoir needs less frequent filling
Step 5: Cold Weather Protection (Optional)
If you live in a cold climate:
- Insulate the reservoir and pipes with foam insulation
- Install thermostatically controlled heating cables
- Check regularly during freezing temperatures
Step 6: Test Your System
- Fill the reservoir and open the valve
- Check for leaks at all connections
- Verify each cup is filling properly
- Make any necessary adjustments
DIY Chicken Waterer Options
Not sure the PVC system is right for you? Here are some alternative DIY watering systems:
1. The $2 Homemade Chicken Waterer
For beginners on a budget:
- Use a 9″ pan and a #10 can (1-gallon)
- Put two holes on opposite sides of the can, about 1″ from open end
- Fill the can, place it on the pan, and flip them together
- Water automatically refills to the level of the holes
2. Soda Bottle Chicken Waterer
Super simple and perfect for small flocks:
- Take a 1-liter plastic soda bottle
- Create small holes using a soldering iron
- Fill with water, cap it, and turn upside down
- Water flows into a small dish below
3. Rain-Collecting Chicken Water System
Sustainable option:
- Collect rainwater in barrels
- Connect to your watering system via garden hose
- Uses a float valve to maintain water level
4. Glass Jar Waterer
Great for chicks:
- Use a glass jar instead of plastic
- Works similarly to the soda bottle system
- Easier to clean and sanitize
Maintaining Your Chicken Watering System
To keep your watering system working well:
- Check daily that all cups are filling properly
- Clean cups and wipe down pipes weekly to prevent algae
- Empty and clean the reservoir monthly
- Monitor for leaks and tighten connections as needed
- In winter, check that heated elements are functioning if installed
Frequently Asked Questions
How long does a 5-gallon bucket of water last for chickens?
A 5-gallon bucket (40 pints) can last anywhere from a few days to two weeks, depending on flock size and weather. Since a single chicken drinks about a pint daily, one chicken could theoretically go 40 days on a 5-gallon bucket, but multiple factors affect consumption.
Should the chicken waterer be inside or outside the coop?
Waterers should generally be outside in the run. Moisture inside the coop can create humidity problems, especially in winter. However, I keep a small waterer inside my large coop on the nesting boxes for nighttime drinking.
How do you keep a chicken waterer from freezing without electricity?
Use insulated buckets or wrap containers with bubble wrap, foam insulation, or blankets. This won’t prevent freezing indefinitely but will slow the process considerably.
Can you build a chicken waterer from a 55-gallon drum?
Absolutely! A 55-gallon drum makes an excellent reservoir for larger flocks, providing water for extended periods. Just follow the same principles of installing a bulkhead fitting and connecting to your distribution system.
Final Thoughts
Building your own chicken coop watering system might seem daunting at first, but it’s actually pretty simple once you gather the materials. The initial effort pays off quickly with less daily maintenance and happier, healthier chickens.
I’ve been using my DIY system for over a year now, and it’s been a game-changer for our homestead. No more lugging water containers every day or dealing with dirty, contaminated water. My chickens stay hydrated, and I save tons of time.
Have you built your own chicken watering system? What worked best for your flock? Share your experiences in the comments below!
Happy homesteading!

Introduction: PVC Chicken Waterer
An easy way to keep your flock watered and not have a mess with overturned water containers!
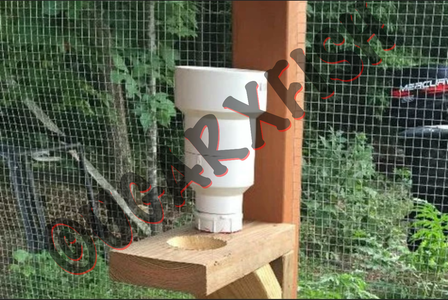
Step 5: Top Half Construction
Another picture opportunity missed! Sorry! 🙂
To connect the 4″x3″ coupler and the 3″x2″ coupler, use the 3″ piece of 3″ PVC pipe and secure them together with cement. You can use a longer piece to give the top more height, but I think the closer the jug is to the wooden bracket, the less likely you will be to have the jug fall off or be wobbly.
Add a cleanout adapter to the 2″ opening of the couplers with glue and allow all the pieces to cure for 2 hours or whatever the recommendations of the pipe cement is that you are using.