Ever stared at a whole chicken wondering how to make it cook faster and more evenly? I’ve been there too! Learning how to butterfly a whole chicken (also called spatchcocking) was a total game-changer for my weeknight dinner routine. This simple technique cuts roasting time nearly in half and gives you the juiciest meat with the crispiest skin imaginable.
I’m gonna walk you through this step-by-step process that’ll have you looking like a pro chef in no time! Trust me, once you try this method, you’ll never go back to roasting a chicken the old way again.
What Does Butterflying a Chicken Mean?
Before we dive into the how-to let’s get clear on what we’re talking about. Butterflying a chicken also known as spatchcocking, is simply a method where you remove the backbone of the bird and flatten it out. The name “spatchcock” sounds fancy, but it’s just chef-speak for a butterflied chicken!
This technique has several major benefits
- Faster cooking time – A butterflied chicken cooks in about half the time of a whole bird
- More even cooking – Both dark and white meat finish at the same time
- Crispier skin – More surface area exposed to heat means crackly, delicious skin
- Better seasoning – Easier to get flavors under the skin and throughout the meat
- Easier carving – The flattened bird is simpler to portion after cooking
What You’ll Need to Butterfly a Chicken
Getting your tools ready first makes this process so much easier! Here’s what you’ll want to have on hand:
- A whole chicken (4-5 pounds works great)
- Sharp kitchen shears (this is the MVP tool here)
- A sturdy cutting board
- A sharp paring knife (optional but helpful)
- Paper towels
- Your favorite seasonings
I prefer using kitchen shears over knives because they give you more control when cutting through bones. Trust me on this one – good kitchen shears make the whole process way easier!
Step-by-Step Guide: How to Butterfly a Whole Chicken
Alright, let’s get down to business! I’m gonna break this down into super easy steps so you can follow along no matter your skill level.
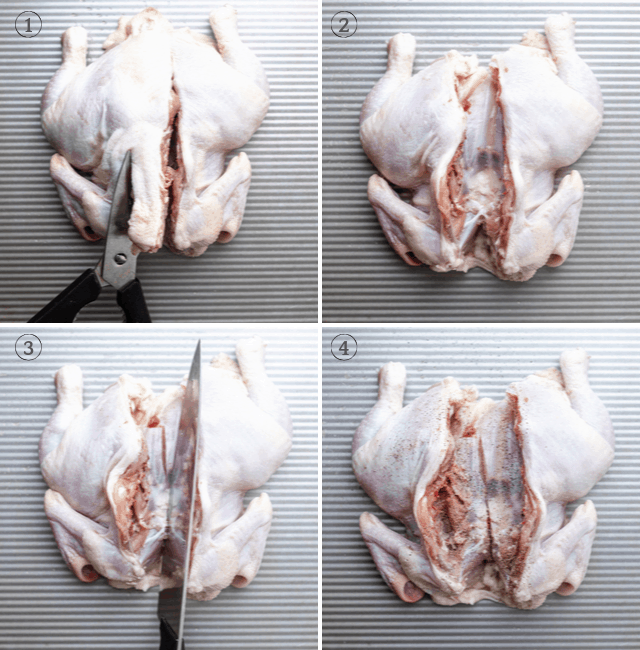
Step 1: Position Your Chicken
Place your chicken breast-side down on a sturdy cutting board with the legs facing toward you. This gives you the best angle to work with. Make sure your cutting board is secure and won’t slide around.
Step 2: Remove the Backbone
This is where your kitchen shears become your best friend! Starting at the tail end:
- Hold the chicken firmly with one hand
- With your kitchen shears in the other hand, cut along one side of the backbone, staying as close to it as possible
- Cut all the way from tail to neck
- Repeat on the other side of the backbone
- Remove the backbone completely (don’t throw it away – it makes great stock!)
If you’re having trouble, try cutting in smaller snips rather than trying to cut through too much at once. The backbone should be about 1-1.5 inches wide when removed.
Step 3: Open Up the Chicken
Once the backbone is removed, open up the chicken like a book. You’ll notice there’s still some cartilage and possibly a breastbone in the center.
Step 4: Remove the Breastbone (Optional)
Some recipes skip this step, but I think removing the breastbone helps the chicken lay even flatter:
- Look for the soft, white, almost transparent piece of cartilage in the center
- Cut on either side of it so you can grab hold
- Cut around it while pulling to remove it completely
This step isn’t absolutely necessary, but it does help create an evenly flattened bird.
Step 5: Flip and Flatten
Now comes the most satisfying part!
- Flip the chicken over so it’s skin-side up
- Place your palms firmly on the breastbone area
- Press down with some force until you hear a crack – that’s the wishbone breaking
- The chicken should now lay completely flat
Some folks say this is where you get to take out some frustration, lol! Just don’t press TOO hard – you want to crack the breastbone, not pulverize the chicken.
Step 6: Tuck the Wings
The wing tips can burn easily since they’re so thin. To prevent this:
- Tuck the wing tips behind the breasts
- This keeps them protected during cooking
Step 7: Season Your Chicken
Now your chicken is perfectly positioned for seasoning:
- Pat the chicken dry with paper towels (this helps the skin get crispy)
- Season generously with salt, pepper, and any herbs you like
- For extra flavor, carefully lift the skin and add seasonings directly to the meat
Roasting Your Butterflied Chicken
Now that you’ve successfully butterflied your chicken, it’s time to cook it! Here’s my foolproof method:
- Preheat your oven to 450°F (232°C) – high heat is key for crispy skin!
- Place the butterflied chicken on a wire rack set in a foil-lined baking sheet
- Position the chicken so the breasts are toward the center of the pan and the legs toward the edges
- Roast for about 45 minutes, or until the breast meat registers 150°F and thigh meat reaches 170°F
- Let the chicken rest for 5-10 minutes before carving
The genius part about this setup is that it takes advantage of how heat circulates in the oven. The center of the pan stays slightly cooler than the edges, which means the breast meat (which needs less cooking) stays in the cooler area, while the legs (which need more cooking) get more heat at the edges. Pretty clever, right?
Bonus: Make an Easy Jus with the Backbone
Don’t waste that backbone! While your chicken roasts, make a quick and delicious jus:
- Cut the backbone into 1-inch pieces
- Heat a tablespoon of oil in a small saucepan
- Brown the backbone pieces
- Add chopped onion, carrot, and celery and cook until lightly browned
- Add a cup of vermouth or dry sherry, plus a cup of water
- Simmer for 20 minutes, then strain
- Reduce the liquid to about 1/3 cup
- Finish with a splash of soy sauce, lemon juice, and a bit of butter
This jus takes your chicken from great to restaurant-quality amazing!
Common Problems and Solutions
Sometimes things don’t go perfectly on the first try. Here are some common issues and how to fix them:
Problem: I can’t get the backbone out.
Solution: Make sure your kitchen shears are sharp. Cut in smaller increments and wiggle the backbone as you go to help separate it.
Problem: My chicken won’t flatten out.
Solution: Press down more firmly on the breastbone. You need to crack it to get the chicken to lay flat. You can also place a heavy pan on top and press down.
Problem: The skin isn’t getting crispy.
Solution: Make sure to pat the chicken dry before roasting. Also, don’t baste with pan juices (the moisture prevents crisping). Instead, brush with a little oil or butter.
Problem: The breast meat is overcooked.
Solution: Position the chicken with breasts toward the center of the pan and legs toward the edges. Also, use a meat thermometer and remove the chicken when the breast reaches 150°F.
Why Butterflying a Chicken Is Better Than Traditional Roasting
I’m totally convinced that butterflying is the superior way to roast a chicken, and here’s why:
- Time savings – A whole chicken takes 90+ minutes to roast, while a butterflied chicken is done in about 45 minutes
- Even cooking – No more dry breast meat and undercooked thighs!
- Better flavor penetration – Seasonings reach more of the meat
- Crispier skin all over – More surface area exposed to heat
- Easier to carve – The flat shape makes portioning simpler
Creative Ideas for Your Butterflied Chicken
Once you’ve mastered the basic technique, try these variations:
- Herb-rubbed: Mix minced garlic with fresh herbs like rosemary, thyme, and sage and rub under the skin
- Lemon-pepper: Add lemon zest to your pepper rub and place lemon slices under the chicken
- BBQ style: Grill your butterflied chicken instead of roasting it
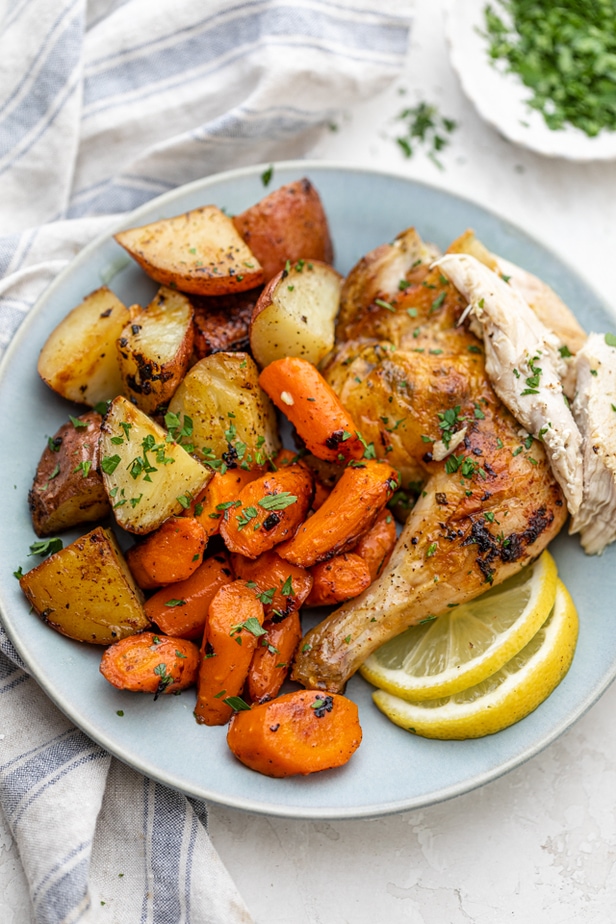
- Sheet pan dinner: Surround your chicken with vegetables that roast in the same time (potatoes, carrots, Brussels sprouts)
Final Thoughts
Learning how to butterfly a whole chicken might seem intimidating at first, but I promise it’s one of those techniques that looks harder than it actually is. With a good pair of kitchen shears and a little confidence, you’ll be spatchcocking chickens like a pro in no time!
This technique has seriously revolutionized my weeknight cooking. I can now have a perfectly roasted chicken on the table in under an hour, complete with crispy skin and juicy meat. Plus, my family thinks I’m some kind of culinary wizard, which is always a nice bonus!
Give it a try this week and I bet you’ll be as hooked on this method as I am. Your taste buds (and dinner schedule) will thank you!

How to Spatchcock a Chicken
- Place whole chicken breast side down. Use kitchen shears to cut through the ribs along the spine on both sides.
- When you remove the spine and bones, don’t discard it. Save it to make homemade chicken broth.
- Use a heavy knife to slightly cut into the sternum.
- Open the rib cage, and pop out the breast bone to flatten the chicken. Season inside the chicken with half the salt and pepper.
Tips for Making Spatchcock Chicken
- Use a whole chicken that’s 2-4 pounds. This spatchcock technique is intended for a young bird and anything larger will make it difficult to cut the backbone.
- Set the uncooked chicken at room temperature for 30 minutes before roasting. This allows the whole chicken to have an even temperature for even browning.
- Use strong kitchen shears to cut the backbone. Make sure the scissors are sharp, and it will make the cutting so much easier as compared to using a knife.
- Be careful not to over-bake so the chicken breast doesn’t come out dry. While the ideal temperature for cooking chicken is 165˚F, keep in mind that the temperature will continue to increase while the chicken is resting outside the oven. So most sources I’ve read recommend removing the chicken when the internal temperature reaches 160˚F.
I love that this is a faster way to roast a whole chicken that doesn’t require marinating in advance or doing anything fancy. Butterflying the chicken using this spatchcock technique is simple enough to whip up on weeknights but it looks elegant for when you’re entertaining a crowd. It’s a great recipe for the holidays!
How to Butterfly a Chicken | Food Network
FAQ
What is a butterfly chicken?
To butterfly chicken is usually a term used when cooking with boneless chicken breast fillets. Chicken breast fillets are usually shaped thicker in some areas than others. This can make even cooking a problem when dealing with bigger fillets. By the time the thickest part has cooked, the thinner parts have overcooked and dried out.
How do you butterfly a whole chicken?
A quick and efficient method to cooking a whole chicken is to butterfly it. Step 1: Firstly, remove any excess fat, typically just inside the cavity. Turn the chicken over so it is breast side down. Face the chicken with the tail end closest to you.
What is grilled butterflied whole chicken?
This Grilled Butterflied Whole Chicken is an excellent technique used to reduce grilling time and results in a more uniform cook. It takes just a couple of easy steps to achieve tender and juicy chicken on the grill. I am a big believer that the best recipes are the ones that don’t need 50 ingredients to make it delicious.
Is it better to bake a whole chicken at 350 or 400?
You can roast or bake anywhere between 325 and 450 degrees F. When roasting a whole chicken, a nice rule of them is to start at 400 to 425 degrees F and then turn the oven down to 350 after 15 minutes and cook until the internal temp of the chicken is 165 – 175 degrees F on an instant read thermometer.Oct 1, 2021
How long to bake a butterflied chicken?
What is the difference between butterfly and Spatchcock chicken?
Spatchcocking prepares a whole chicken by removing the backbone and flattening it for faster, more even cooking, while butterflying can refer to this technique for a whole bird or a more general method of slicing and flattening individual meat items like a chicken breast or steak. Therefore, spatchcocking is a specific type of butterflying used for whole poultry, aiming to achieve crispy skin and juicy meat by exposing more surface area to the heat.
How long to cook butterfly chicken in the oven at 400 degrees?
Roast in the oven for about 45 to 50 minutes, or until a meat thermometer inserted in the thickest part of the breast and thighs register 165 degrees F (or 160 degrees F, as it will rise by about 5 degrees as it rests). That’s how long it takes to cook a 4.5 pound chicken.