Hey there, kitchen warriors! If you’re lookin’ to whip up a meal that’s quick, tasty, and got that heckuva crispy crunch, you’ve landed in the right spot. Today, we’re divin’ headfirst into the art of fryin’ thin chicken breast. This ain’t just any ol’ chicken recipe—it’s a game-changer for busy nights, family dinners, or when you’re just cravin’ somethin’ downright delish. I’ve been messin’ around with this technique for years, and lemme tell ya, once you nail it, there’s no goin’ back. So, grab your skillet, and let’s turn those plain chicken breasts into golden, juicy perfection!
Why Thin Chicken Breast is Your New Best Friend
Before we get our hands dirty, let’s chat about why thin chicken breasts are the bomb for fryin’ Unlike their thicker cousins, these babies cook up fast and even, meanin’ you ain’t gotta wait forever for dinner. Plus, that thin cut soaks up flavor like a sponge and gets crispy without turnin’ into a dry ol’ hockey puck Whether you’re slicin’ ‘em for a salad, stackin’ ‘em in a sandwich, or just eatin’ ‘em straight outta the pan (no judgment here), they’re versatile as heck. I’ve used ‘em for everything from quick lunches to fancy-ish dinners, and they never let me down.
What You’ll Need to Fry Thin Chicken Breast
Alright let’s round up the goods. Fryin’ thin chicken breast don’t require no fancy-pants ingredients or gear. Here’s the basics to get you started, straight from my kitchen to yours
- Thin Chicken Breasts: Aim for pieces about 1/4 to 1/2 inch thick. You can buy ‘em pre-sliced at the store, or grab regular breasts and pound ‘em down yourself (more on that soon). Boneless and skinless works best, but if you’ve got bone-in, just slice ‘em thin.
- Flour: A light dustin’ of all-purpose flour—bout 1/2 cup for a pound or so of chicken—starts the breadin’ process.
- Eggs: Grab 2-3 large ones to coat the chicken. They help the crumbs stick like glue.
- Breadcrumbs: Panko is my go-to for that extra crunch, but regular breadcrumbs work too. You’ll need 2-3 cups. Bonus points if you toss in some salt, pepper, or even a pinch of garlic powder for flavor.
- Oil: Pick somethin’ with a high smoke point—think canola, vegetable, or avocado oil. I like avocado for its clean taste, and you’ll need enough to cover the pan bottom, bout 1/4 to 1/2 inch deep.
- Salt and Pepper: Season every dang layer—chicken, flour, crumbs. Don’t skimp!
- Optional Spices: Wanna kick it up? Add paprika, cayenne, or dried herbs to the breadcrumbs. I sometimes sneak in a lil’ Parmesan for a cheesy vibe.
And for tools keep it simple
- A heavy skillet or cast iron pan (holds heat like a champ).
- Tongs for flippin’ without burnin’ your fingers.
- A meat mallet or rollin’ pin if you’re poundin’ your own chicken.
- A wire rack or paper towels for drainin’ the oil.
- A thermometer if you wanna be fancy and check oil temp or chicken doneness (aim for 350-375°F for oil, 165°F internal for chicken).
Got all that? Sweet, let’s move on to the fun part!
Step-by-Step: How to Fry Thin Chicken Breast Like a Boss
Fryin’ thin chicken breast ain’t rocket science, but there’s a few tricks to get that perfect golden crust and juicy inside. I’ve burned my fair share of chicken over the years (oops), so trust me when I say followin’ these steps will save ya some grief. Here’s the breakdown:
1. Prep Your Chicken
If your chicken ain’t already thin, you gotta make it so. Lay a breast between two sheets of plastic wrap or in a zip-top bag, and give it a good whack with a meat mallet or rollin’ pin till it’s even, bout 1/4 to 1/2 inch thick. This ain’t just for looks—it cooks quicker and more even-like. Pat ‘em dry with paper towels (wet chicken don’t crisp up right), and sprinkle with salt and pepper. I usually do this while beltin’ out some tunes—makes the kitchen feel alive!
2. Set Up Your Breadin’ Station
Grab three shallow bowls or plates. In the first, toss in your flour with a pinch of salt and pepper. Second bowl, beat them eggs till smooth. Third, dump in the Panko or breadcrumbs, maybe mixin’ in some extra spices if you’re feelin’ wild. Line ‘em up like an assembly line—flour, egg, crumbs. This setup keeps things neat, though I still manage to get flour everywhere. Typical me!
3. Bread the Chicken
Take a chicken piece, dredge it lightly in flour (shake off extra), dip it in egg till coated, then press it into the crumbs. Make sure them crumbs stick good—give it a lil’ pat. Let the breaded pieces chill on a plate for 10-20 minutes before fryin’. This helps the coat stay put, not peel off in the pan. I’ve skipped this step before and regretted it—breading all over the dang place!
4. Heat That Oil
Pour your oil into the skillet, enough to cover the bottom bout 1/4 to 1/2 inch deep. Crank the heat to medium-high and let it get hot—real hot, like 350-375°F if you’ve got a thermometer. No thermometer? Do what I do: stick the end of a wooden spoon in the oil. If tiny bubbles form around it, you’re good to go. If not, wait a bit longer. Too-cold oil makes greasy chicken, and ain’t nobody got time for that.
5. Fry ‘Em Up
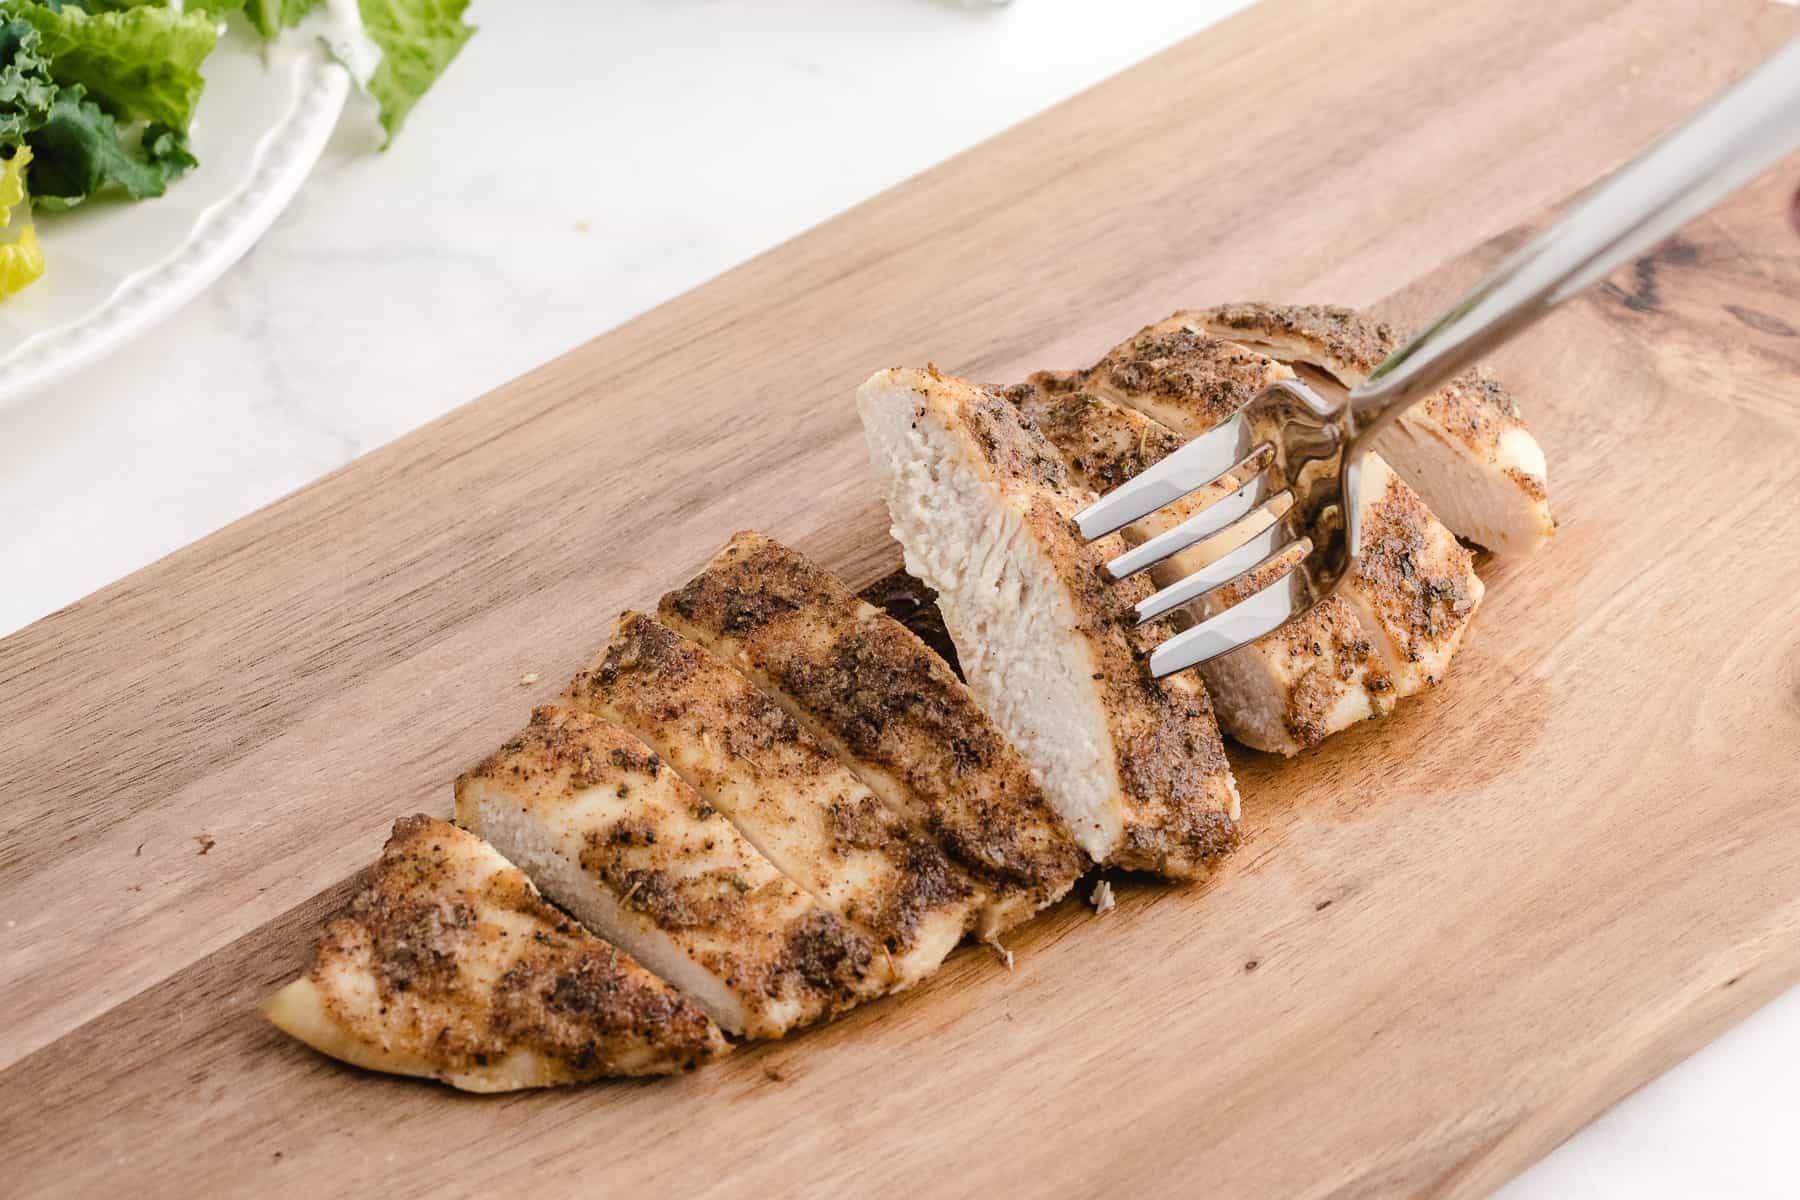
Gently lay 1-2 pieces of chicken in the hot oil—don’t crowd the pan or they won’t crisp up. Let ‘em sizzle for 3-5 minutes per side till they’re a deep golden brown. Flip with tongs, not a fork (don’t wanna pierce the meat and lose juices). Keep an eye on the heat—if it’s smokin’ too much, turn it down a notch. I’ve overcrowded before, and it’s a soggy mess. Two at a time is my rule now.
6. Check if It’s Done
Chicken’s safe to eat at 165°F internal temp. If you’ve got a thermometer, poke it in the thickest part. No gadget? Cut into one piece—juices should run clear, no pink inside. Don’t overcook, though, or it’ll dry out faster than a desert. Been there, done that, and it’s a sad dinner.
7. Drain and Rest
Pull the chicken outta the pan and set it on a wire rack or paper towel-lined plate to drain off extra oil. Sprinkle a lil’ more salt while it’s hot—it sticks better that way. Let it rest for 5 minutes before diggin’ in. This locks in the juices, makin’ every bite tender. I’ve burned my tongue jumpin’ the gun—patience pays off!
There ya have it—the roadmap to crispy, juicy heaven. Follow these, and you’re golden (pun totally intended).
Tips for the Best Fried Thin Chicken Breast Ever
I’ve fried enough chicken to know where things can go wrong, so here’s some insider tips to keep your game strong. These lil’ nuggets of wisdom (see what I did there?) come from trial and error in my own kitchen:
- Pound Evenly: Uneven thickness means some parts overcook while others stay raw. Take a sec to get it right—your taste buds will thank ya.
- Hot Oil is Key: If the oil ain’t hot enough, the chicken soaks it up like a sponge and gets greasy. Test with that wooden spoon trick or invest in a cheap thermometer. Worth it.
- Don’t Crowd: Fry in batches. Crammin’ too many pieces drops the oil temp and steams ‘em instead of fryin’. I’ve made this mistake on busy nights—never again.
- Rest the Breading: Let the breaded chicken sit a bit before fryin’. It helps the coat stick, so you don’t lose half of it in the pan. Learned this the hard way.
- Double-Dredge for Crunch: Want extra crispy? Dip back in flour and egg before the final crumb coat. It’s a lil’ more work, but dang, it’s worth it for that shatterin’ bite.
- Season Every Step: Don’t just season the chicken—add a pinch of salt and pepper to the flour and crumbs too. Layers of flavor, baby!
- Let It Rest Post-Fry: Givin’ it a few minutes after fryin’ keeps it juicy. Cut in too soon, and all that goodness leaks out. Trust me, I’ve cried over dry chicken.
Common Mistakes When Fryin’ Thin Chicken Breast (and How to Fix ‘Em)
Even I’ve goofed up plenty of times, so let’s talk about what not to do. Here’s the pitfalls and how to dodge ‘em:
- Overcookin’: Biggest sin ever. Thin chicken cooks fast, so don’t leave it in too long. Use a timer if you gotta—3-5 minutes per side max. Check that 165°F mark and pull it out.
- Oil Too Cold: Leads to soggy, oily chicken. Heat it proper before addin’ the meat. If it ain’t sizzlin’ right away, pull it out and wait.
- Wet Chicken: If you don’t pat it dry, the breading won’t stick and it’ll steam instead of fry. Paper towels are your friend—use ‘em!
- Skippin’ the Rest: Both before fryin’ (for breading) and after (for juiciness). I used to rush, and my chicken paid the price. Slow down a smidge.
- Crowdin’ the Pan: Already said it, but it bears repeatin’. Give each piece space to shine, or you’ll get a sad, soggy mess.
Variations to Spice Up Your Fried Chicken Game
Bored of the same ol’ thing? We can switch it up! Here’s a few ideas I’ve played with over the years to keep things fresh:
- Spicy Kick: Mix some cayenne or hot sauce into the egg wash, or toss chili powder in the crumbs. I did this for a game night snack, and my buddies couldn’t stop eatin’!
- Herby Vibes: Add dried thyme, rosemary, or Italian seasonin’ to the breadcrumbs for a fancy twist. Pairs great with a side of pasta.
- Cheesy Crust: Grate some Parmesan or Pecorino into the Panko. It fries up golden and nutty—perfect for a quick chicken parm.
- Air Fryer Option: If you’re dodgin’ oil, bread it the same, spray with a lil’ oil, and air fry at 400°F for 6-8 minutes, flippin’ halfway. Ain’t as crispy as pan-fryin’, but it’s healthier.
- Gluten-Free Swap: Use gluten-free flour and Panko. I’ve got a friend who can’t do gluten, and this tweak still gets that crunch without the tummy ache.
What to Serve with Fried Thin Chicken Breast
Fried chicken is awesome on its own, but pairin’ it with the right sides takes it to the next level. Here’s what I love to whip up alongside:
- Mashed Potatoes: Creamy, buttery goodness soaks up any extra flavor. I add a lil’ garlic for a kick.
- Coleslaw: That cool, tangy crunch cuts through the richness of fried chicken. Homemade with a lil’ mayo and vinegar is my jam.
- Roasted Veggies: Think carrots, broccoli, or Brussels sprouts. Toss ‘em in olive oil, salt, and pepper, roast at 400°F for 20 minutes. Easy-peasy.
- Green Salad: Keep it light with some mixed greens, cherry tomatoes, and a simple vinaigrette. Balances out the heavy fry.
- Biscuits: Fluffy, warm biscuits for dippin’ or just eatin’. I’ve got a quick recipe with self-risin’ flour if you wanna try.
Or, slice that chicken up and throw it on a bun with lettuce, mayo, and pickles for a killer sandwich. I’ve done this for picnics, and it’s always a hit.
FAQs: Your Burnin’ Questions Answered
I’ve heard all kinda questions over the years about fryin’ chicken, so lemme tackle the big ones right here:
- How do I know when it’s done without a thermometer? Cut into the thickest part—juices should be clear, no pink. But honestly, get a cheap thermometer. It’s a lifesaver.
- What if I don’t have breadcrumbs? Crush up some crackers, cornflakes, or even use a lil’ extra flour. Season it good, and you’re set.
- Can I fry frozen chicken? Nah, don’t do it. Thaw it first in the fridge overnight. Frozen stuff cooks uneven and gets dry. Learned that the hard way.
- How do I keep it from gettin’ greasy? Make sure that oil is hot enough before tossin’ the chicken in. Cold oil = grease bomb. And drain it proper after fryin’.
- Can I bake instead of fry? Yup, for a healthier take, bake at 375°F for 15-20 minutes till it hits 165°F inside. Won’t be as crispy, but still tasty.
- How long does leftovers last? Pop ‘em in an airtight container in the fridge for 3-4 days. Reheat in the oven or air fryer—microwavin’ makes ‘em soggy.
Why This Recipe Will Become Your Go-To
Lemme tell ya, once you’ve fried up a batch of thin chicken breasts with this method, it’s gonna be on repeat in your kitchen. It’s quick enough for a weeknight when you’re dog-tired, but tasty enough to impress folks at a weekend get-together. I’ve had friends beg for my “secret” recipe, and I just laugh—ain’t no secret, just a lil’ patience and the right steps. Plus, you can tweak it a million ways to match your mood or whatever’s in the pantry.
Bonus: A Lil’ Story from My Kitchen
I remember the first time I tried fryin’ chicken like this. I was a total newbie, prob’ly 20 years old, livin’ in my first apartment with a skillet older than dirt. I didn’t pound the chicken, didn’t heat the oil right, and ended up with a half-raw, half-burnt disaster. But I kept at it, watchin’ my mom and grandma, pickin’ up lil’ tricks here and there. Now, every time I fry up a batch, it’s like a lil’ victory dance in my head. There’s somethin’ magic about that sizzle in the pan and the smell fillin’ the house. Makes me wanna cook for everyone I know.
Final Thoughts on Fryin’ Thin Chicken Breast
So, there ya go—everything I’ve learned about how to fry thin chicken breast, laid out for ya to try. It’s all about keepin’ it simple, gettin’ that oil hot, and not overthinkin’ it. Grab some chicken next time you’re at the store, follow these steps, and I bet you’ll be grinnin’ ear to ear with that first crispy bite. We’ve all gotta eat, so why not make it somethin’ worth savorin’? Drop me a comment if you’ve got tricks of your own or if somethin’ goes wonky—I’m all ears. Now, get fryin’, and let’s eat good tonight!
How to Fry Chicken Cutlets Without Breadcrumbs Recipe
Chicken cutlets are thin-cut boneless skinless chicken breasts. They’re very popular in Italian cooking but, often they’re breaded and fried. They’re used to make Chicken Parmesan where the chicken is topped with tomato sauce and mozzarella cheese and then baked so the cheese melts.
Use paper towels to drain some of the excess oil.
*The full, printable recipe is in the recipe card below.
- chicken cutlets
- all-purpose flour
- eggs (for egg wash)
- salt and pepper to taste
- fresh garlic or garlic powder)
- extra virgin olive oil (vegetable oil, corn oil, canola oil can be used)
- lemon wedges (optional) )
- First, sprinkle black pepper and if you’re using garlic powder, lightly sprinkle both sides of the cutlet. Save the salt until the end of the cooking.

- Next, set up a dredging station: In separate shallow bowls, set up a coating station. Place 3/4 cup of all-purpose flour on a large plate (dinner plate) and beat the eggs in another shallow bowl.

- Next, dip the chicken cutlet into the beaten eggs (egg wash), making sure it’s fully coated. Allow any excess egg to drip off.
- Then, take each chicken cutlet and dredge it in the flour, ensuring both sides are well-coated.

- Then, in a large skillet, heat the olive oil over medium-high heat. Ensure the oil is hot, but not smoking.
- Next, carefully place the coated chicken cutlets into the hot oil. Fry each side until golden brown and crispy, typically 3-4 minutes per side. Cook in batches to avoid overcrowding the pan.
- Then, once the chicken cutlets are cooked to perfection, transfer them to a paper towel-lined plate to drain any excess oil.
- Last, sprinkle the crispy chicken cutlets with salt.
Store them in an airtight container in your refrigerator for up to three days for maximum freshnes. Use leftover cutlets to make lunch sandwiches.
What kind of oil should I use to fry chicken cutlets?
Why am I using extra virgin olive oil instead of other cooking oils like vegetable, canola or corn oil that have a higher smoke point?
First, olive oil is one of the healthiest oils you can use however, it degrades when exposed to high temperatures.
Second, it adds a tremendous amount of flavor to your food.
Third, because you’re pan frying and not deep frying, there’s enough oil to cook the thin cutlets quickly.
You’ll only need 1/4 cup of EVOO to make this delicious recipe, which may sound like a generous amount of olive oil but, not for frying a pound of chicken!
Avocado oil can be used in place of olive oil as it has a high smoke point. I like to use extra virgin olive oil for this recipe because it adds a lot of flavor to this chicken dish although it does have a relatively low smoke point (325F-375F.)
Therefore, it degrades more than oils with a high smoke point when exposed to high heat.
I do suggest buying thin slices of chicken breast at the grocery store or wherever you get your chicken. Perdue sells them.
You want the thin-sliced boneless skinless chicken breasts. If you buy the regular skinless, boneless chicken breasts and cut them yourself with a sharp knife on a cutting board, you may not be able to get them cut thinly and obtain even thickness. I know, I’ve tried many times.
It makes a difference in the taste and texture when the chicken isn’t thin. You may be thinking a mallet will help thin out the chicken and tenderize it too and that’s your call if you want to do that.
I know the thin chicken cutlets are more expensive and may be harder to find.